 Онлайн Радио 24
 Memtest86 что это за программа
This is the developer’s guide to the Memtest86+ source code. The user’s guide can be found in the README.md file in the top level directory.
Code Organisation
The source code is divided into the following categories, each contained in a subdirectory of the same name:
- app The main application and framework for running the memory tests.
- boot The code that runs from the BIOS or bootloader entry point to the start of the main application.
- lib The subset of the C standard library that is used by Memtest86+ plus other hardware-independent low-level support functions.
- system Low-level support functions that interface to the hardware.
- tests The individual memory tests.
The boot code is mostly written in AT&T syntax x86 assembly language. The remaining code is written in C with a smattering of inline assembly code.
Each category is further subdivided into multiple source files, splitting the code into small units of closely related functionality. For the C code, the API for each unit is defined in a header ( .h ) file and the implementation (if required) is found in the correspondingly named source ( .c ) file.
Code Documentation
Doxygen can be used to automatically generate HTML documentation for the API for each code unit from the comments in the C header files. To regenerate the documentation, change directory into the doc subdirectory and run doxygen .
Coding Conventions
C Code
Macro names and enumeration values are written in upper case separated by underscores. All other identifiers are written in lower case separated by underscores. Both excessive length and excessive abbreviation are avoided.
Line length is normally limited to 120 characters.
Indentation is 4 spaces. No hard tab characters are used.
Opening braces for function bodies are put on a new line. Other opening braces are put on the same line as the construct that introduces them.
The C11 dialect is used. In particular, variable declarations and statements are interspersed and loop variables are declared within the for loop construct.
Assembly Code
Labels are written in lower case separated by underscores. Op-codes and register names are written in lower case.
Line length is normally limited to 120 characters.
Indentation is 8 spaces using hard tab characters.
The C preprocessor is used for defining constant values and expressions. Macro names are written in upper case separated by underscores.
MemTest86
Примечание. Для запуска MemTest86 на компьютерах и ноутбуках без поддержки UEFI, или для запуска программы с загрузочного компакт диска используйте MemTest86 версии 4.3.7.
Полезные ссылки
- Сравнение редакций MemTest86 (английский)
- Как выявить неисправность оперативной памяти на компьютере с Windows 10
Подробное описание
MemTest86 – бесплатная программа, позволяющая проверить оперативную память компьютера или ноутбука на наличие ошибок и проблем в работе. MemTest86 запускается с загрузочного USB носителя и выполняет полную проверку работоспособности ОЗУ.
Новые версии MemTest86 работают в режиме UEFI и имеют поддержку 64-bit, что обеспечивает дополнительные возможности тестирования и поддержку новейшего оборудования и модулей памяти.
Программа MemTest86 является популярным инструментом для тестирование оперативной памяти. С 1994 года её используют системные администраторы, компьютерные мастера и простые пользователи.
Возможности MemTest86
- Загрузка с USB-накопителей.
- 13 различных алгоритмов тестирования.
- Поддержка модулей DDR2, DDR3 и DDR4.
- Поддержка UEFI.
- Графический интерфейс и поддержкой мыши.
- Создание файла с отчётом.
- Базовая информация из SPD.
- Pro DDR/EPP/XMP информация из SPD.
- Pro 64-bit/SIMD тесты.
- Pro Файлы конфигурации для автоматизации тестирования.
Создание загрузочного USB-носителя MemTest86 в Windows
- Скачайте и распакуйте архив с MemTest86.
- Подключите USB-накопитель.
- Запустите приложение ImageUSB.
- Выберите свой USB-накопитель из списка (поле Step 1).
- Выберите пункт “Write image to USB” (поле Step 2).
- Укажите путь к файлу memtest86-usb.img, если он не был определён автоматически (поле Step 3).
- Нажмите кнопку “Write” (поле Step 4).
- Подтвердите очистку USB-накопителя и дождитесь завершения записи.
Создание загрузочного USB-носителя MemTest86 в macOS
- Скачайте и распакуйте архив с MemTest86.
- Подключите USB-накопитель.
- Определите, название устройства USB-накопителя, открыв Терминал и введя команду: diskutil list .
- Размонтируйте все тома на USB-накопителе, введя команду: diskutil unmountDisk [имя устройства] .
- Введите команду «dd» от имени пользователя root для записи образа на USB-накопитель. Например: sudo dd if=memtest86-usb.img of=[USB устройство] , где [USB устройство] – путь к устройству, например /dev/disk1 .
Создание загрузочного USB-носителя MemTest86 в Linux
- Скачайте и распакуйте архив с MemTest86.
- Подключите USB-накопитель.
- Определите, какому устройству назначен USB-накопитель (например, /dev/sdc).
- Введите команду «dd» от имени пользователя root для записи образа на USB-накопитель. Например: sudo dd if=memtest86-usb.img of=[USB устройство] , где [USB устройство] – путь к устройству, например /dev/sdc .
Как скачать MemTest86
Перейдите на страницу загрузки и выберите версию для вашего устройства.
Memtest86 что это за программа
Memtest86+ is a stand-alone memory tester for x86 and x86-64 architecture computers. It provides a more thorough memory check than that provided by BIOS memory tests. Memtest86+ can be loaded and run either directly by a PC BIOS (legacy or UEFI) or via an intermediate bootloader that supports the Linux 16-bit, 32-bit, 64-bit, or EFI handover boot protocol. It should work on any Pentium class or later 32-bit or 64-bit x86 CPU.
Licensing General Public License v2
Memtest86+ v6 is a unified, free, open-source memory testing tool, released under GNU GPL v2.0. The new v6 code base (originally called PCMemTest) was provided by Martin Whitaker, based on Memtest86+ v5, developed by Sam Demeulemeester. Both are now working on Memtest86+.
Memtest86+ is unrelated to ‘Memtest86’, a closed-source `Freemium` software released in 2013 by PassMark Software Pty Ltd.
Screenshots
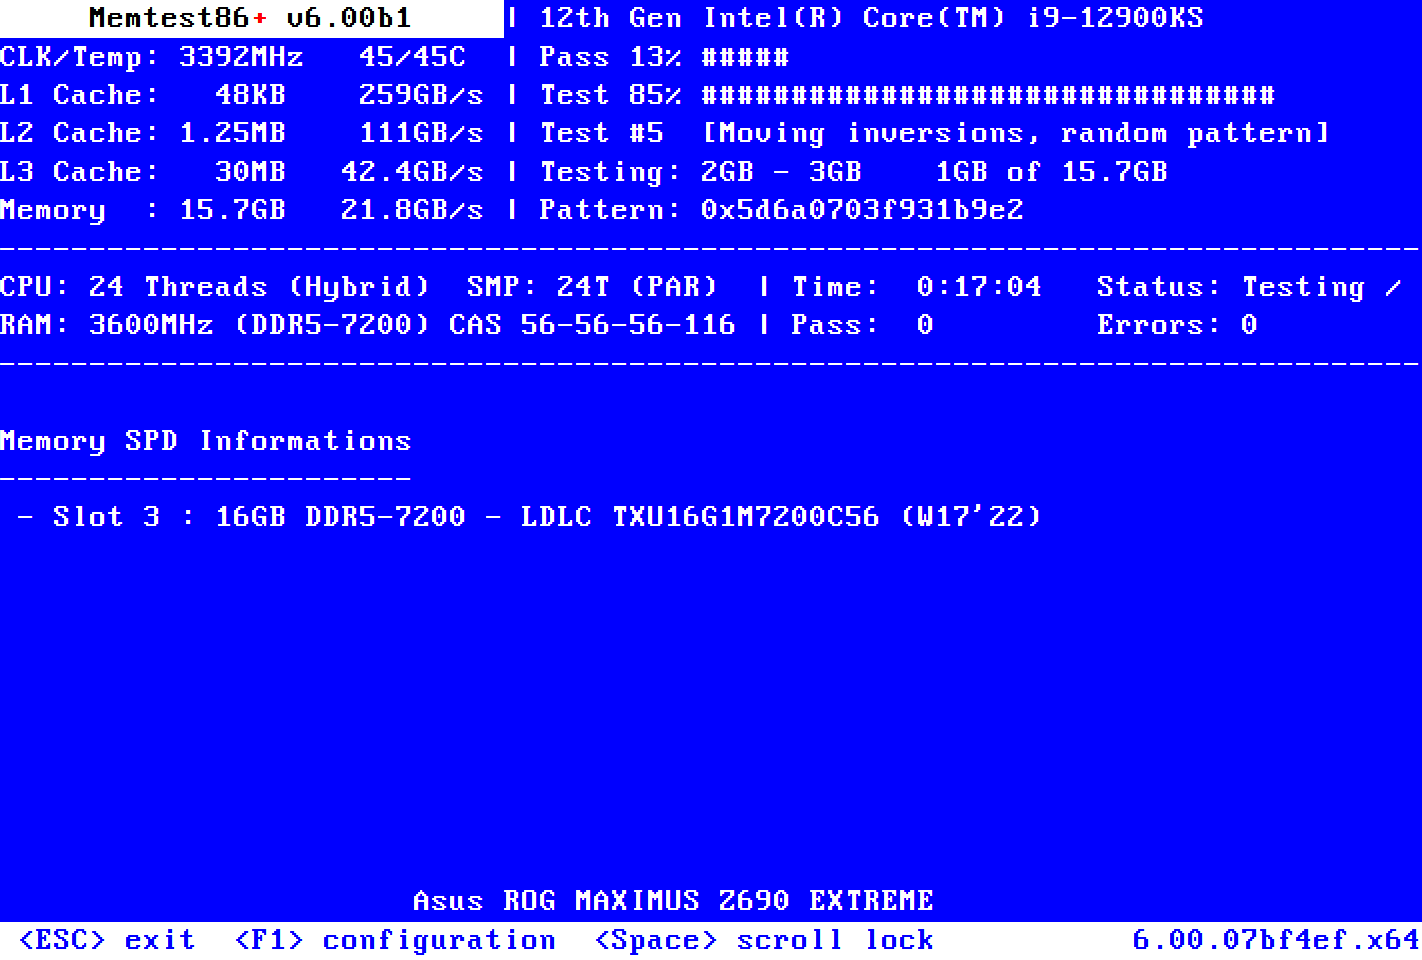
DDR5-7200 Qualification
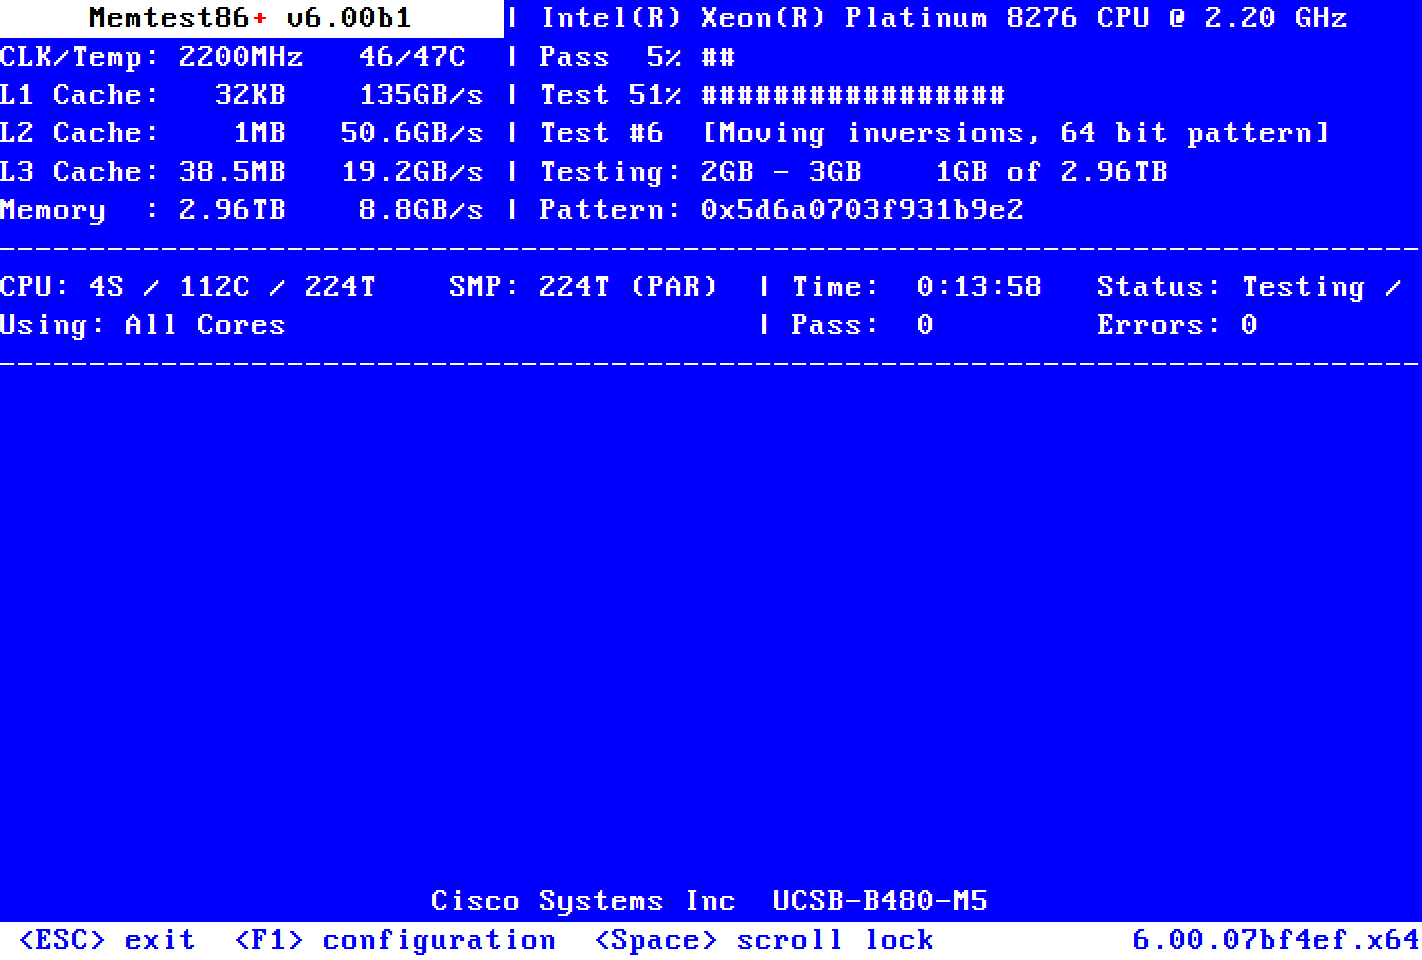
224 Threads, 3TB RAM Server
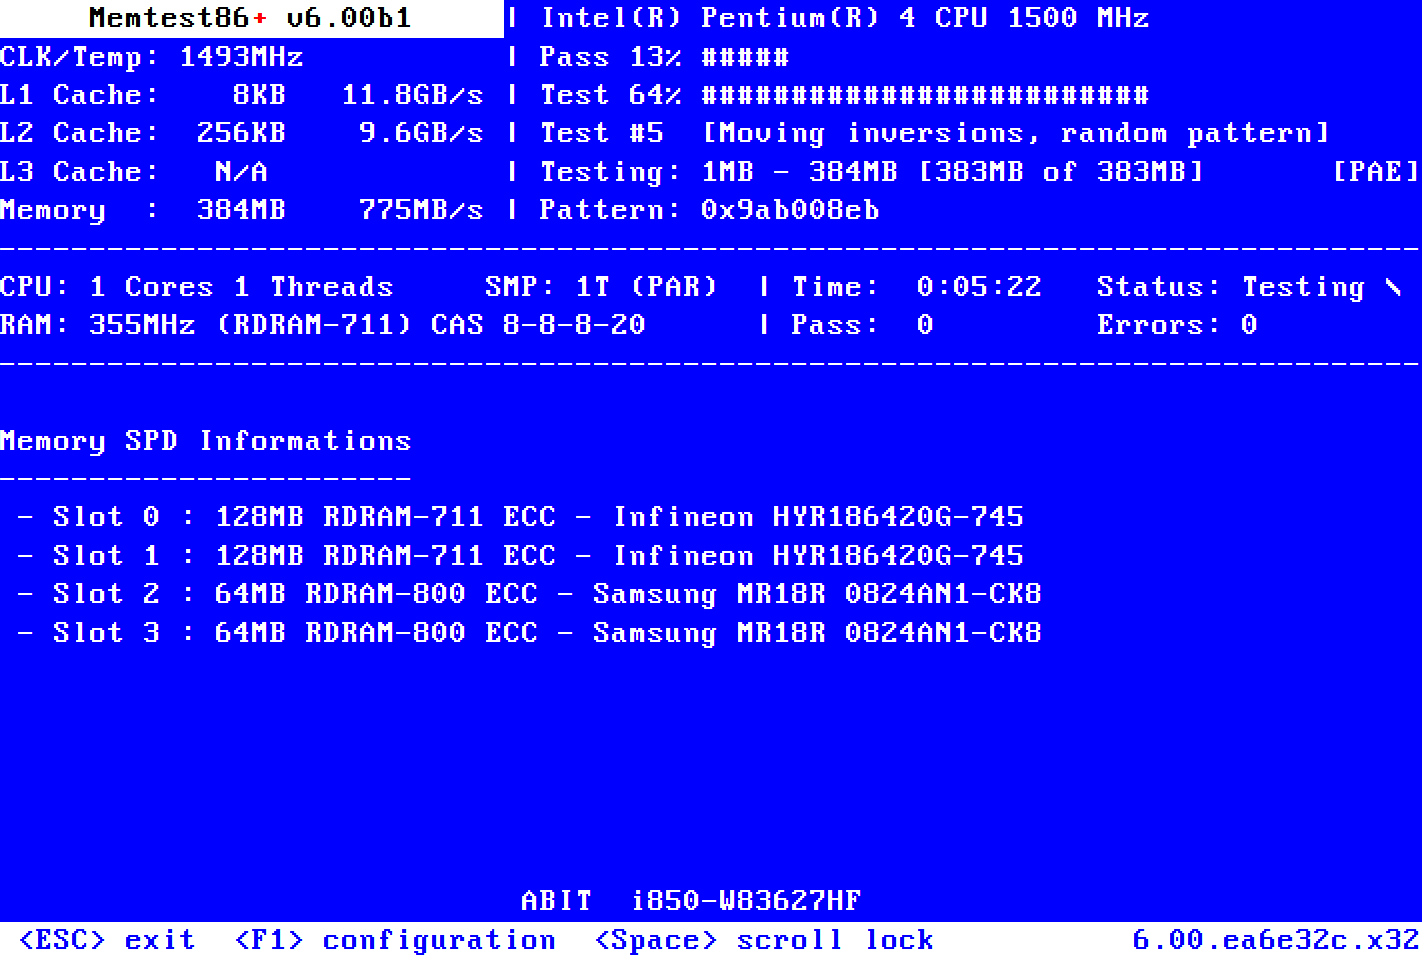
[Retro] Rambus RDRAM on Pentium 4
Why test your RAM?
Troubleshoot PC Instabilities
Memory errors are one of the most common causes of crashes, freezes and instabilities. If you encounter such issues with your computer, testing your RAM thoroughly is probably the first thing to do. Memtest86+ uses various algorithms to reliably detect failures. It will let you know if your RAM is faulty or not.
Ensure Initial Stability
Before using your brand-new PC, putting your new server into production, or after having overclocked your CPU or RAM, it’s often wise to make sure there are no memory issues. Troubleshooting issues later can be annoying, costly, and time-consuming.
Frequently Asked Questions (FAQ)
This FAQ covers the main issues with Memtest86+. Please also read the full README if you don’t find an appropriate answer.
Installation on Removable Media
How to create a bootable Memtest86+ USB Drive using Windows?
Plug a standard FAT32-formatted USB Drive, download and launch the Windows USB Installer and follow the quick steps. Reboot your computer and select the USB Drive in your Boot Menu.
How to create a bootable Memtest86+ USB Drive using Linux?
The ISO image must be written directly (‘dumped’) to the raw device, either by using the dd command or by using a utility that provides the same functionality like balenaEtcher.
How to create a bootable Memtest86+ USB Drive using MacOS
We recommand balenaEtcher to burn the image to a USB Flash Drive under MacOS. PS: Using the Restore function in Apple’s Disk Utility does not work.
Which media are supported?
Memtest86+ can be run from a USB Flash Drive (FAT32 formatted), CDROM drive (by burning the ISO to a blank disk) or Network boot (PXE). If you need a floppy image, use the “make iso” command to generate a ‘floppy.img’ file
Booting Issues
I can’t boot because of a “Secure Boot Violation”
The Memtest86+ binary is not signed by Microsoft, so you need to temporarily disable Secure Boot in your BIOS options. We’re working on a better solution.
Memtest86+ does not launch.
To boot from a USB Flash Drive instead of your hard drive, you must select it using the Boot Menu. The Boot Menu is usually available by pressing F8, F12 or ESC at early startup. Please check your PC/motherboard manual.
Can I launch Memtet86+ using PXE?
Yes. Just use memtest.bin (for BIOS PXE) or memtest.efi (for UEFI PXE) as payload for iPXE or PXELINUX. Don’t forget to disable Secure Boot.
My USB keyboard does not work
Memtest86+ USB drivers are work in progress. Not all USB devices are supported yet, and there may be problems on some hardware. Please submit a bug report with detailed information.
Troubleshooting RAM Errors
I got errors! What’s next?
Once a memory error has been detected, determining the failing module is not a clear-cut procedure. If your computer is overclocked, you should try again at default settings first. Then, if you have more than one memory module, try removing them one at a time to find the faulty one. You can also rotate them. For more informations, look here
I only have some bits wrong. Any solution?
Yes. Both Linux and Windows offer a way to exclude small bad memory areas. An additional Memtest86+ feature is planned to easily generate the required patterns for Windows.
Various
When does it stop?
It doesn’t: Memtest86+ is an endless loop. After a successful pass, all your memory has been tested successfully. You can wait longer for even greater confidence, or just press ESC to stop.
Which tests are executed by Memtest86+?
For a more detailed explanation about Memtest86+’s Test Algorithms and induvial Test Descriptions, please check this section of the README page.
How to use the COM/serial output?
On Windows, edit the file syslinux.cfg at the root of the USB Drive and add “APPEND ttyS0” after “KERNEL mt86plus”. On Linux, pass the parameter “ttyS0” using GRUB ISO. Alternatively, compile your own version with the switch “enable_tty = true” in “config.c. Default settings are 8N1 115200 bps.
Why is Memtest86+ testing more memory than I have?
It doesn’t. The memory on a modern computer is not necessarily mapped in a linear way. E.g.: 16GB of RAM can be virtually mapped from 0-15GB and 16-17GB with a hole between 15GB and 16GB.
При подготовке материала использовались источники:
https://www.memtest.org/dev
https://www.comss.ru/page.php?id=7138
https://www.memtest.org/