 Онлайн Радио 24
 [Notebook/AIO] How to update BIOS with EZ Flash
- Type and search [MyASUS] in the Windows search bar ① , then click [Open] ② . (The left-side search illustration below is in Windows 11, and the right-side is Windows 10.)
If there is no result searched , that means your computer may not install it. Please refer to How to install MyASUS.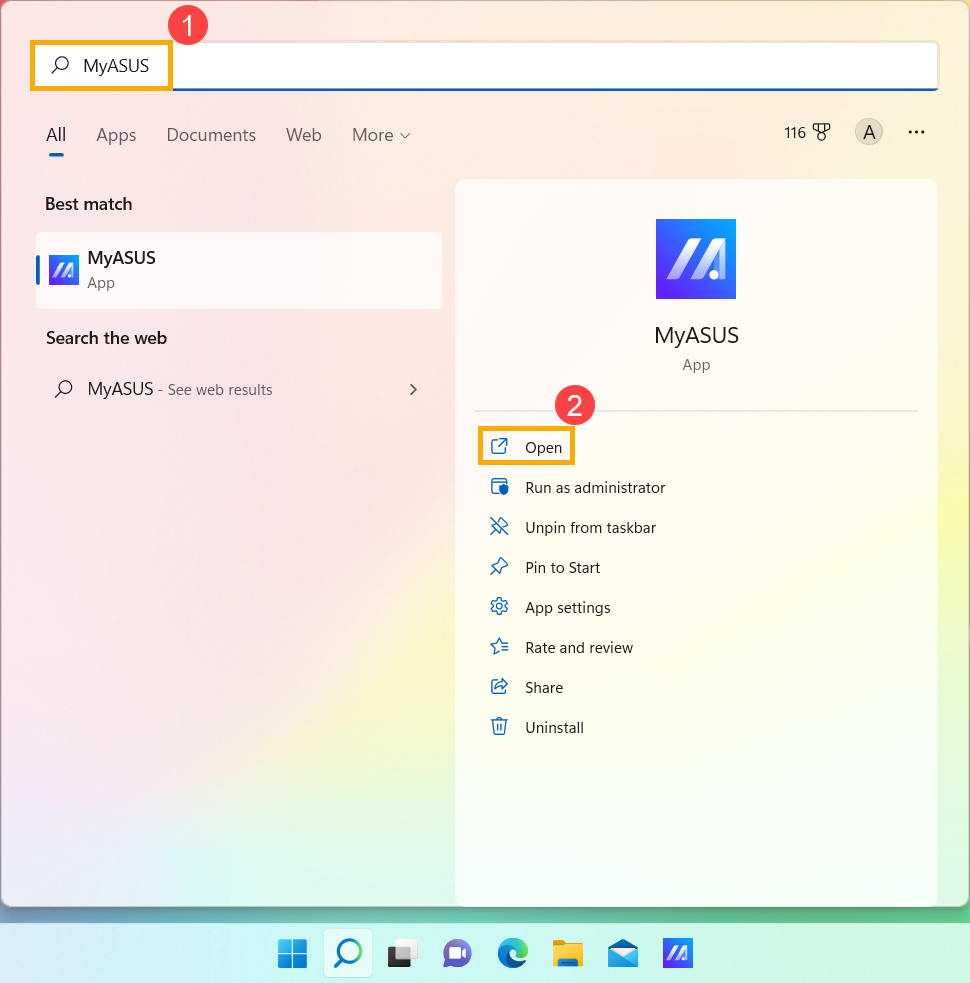

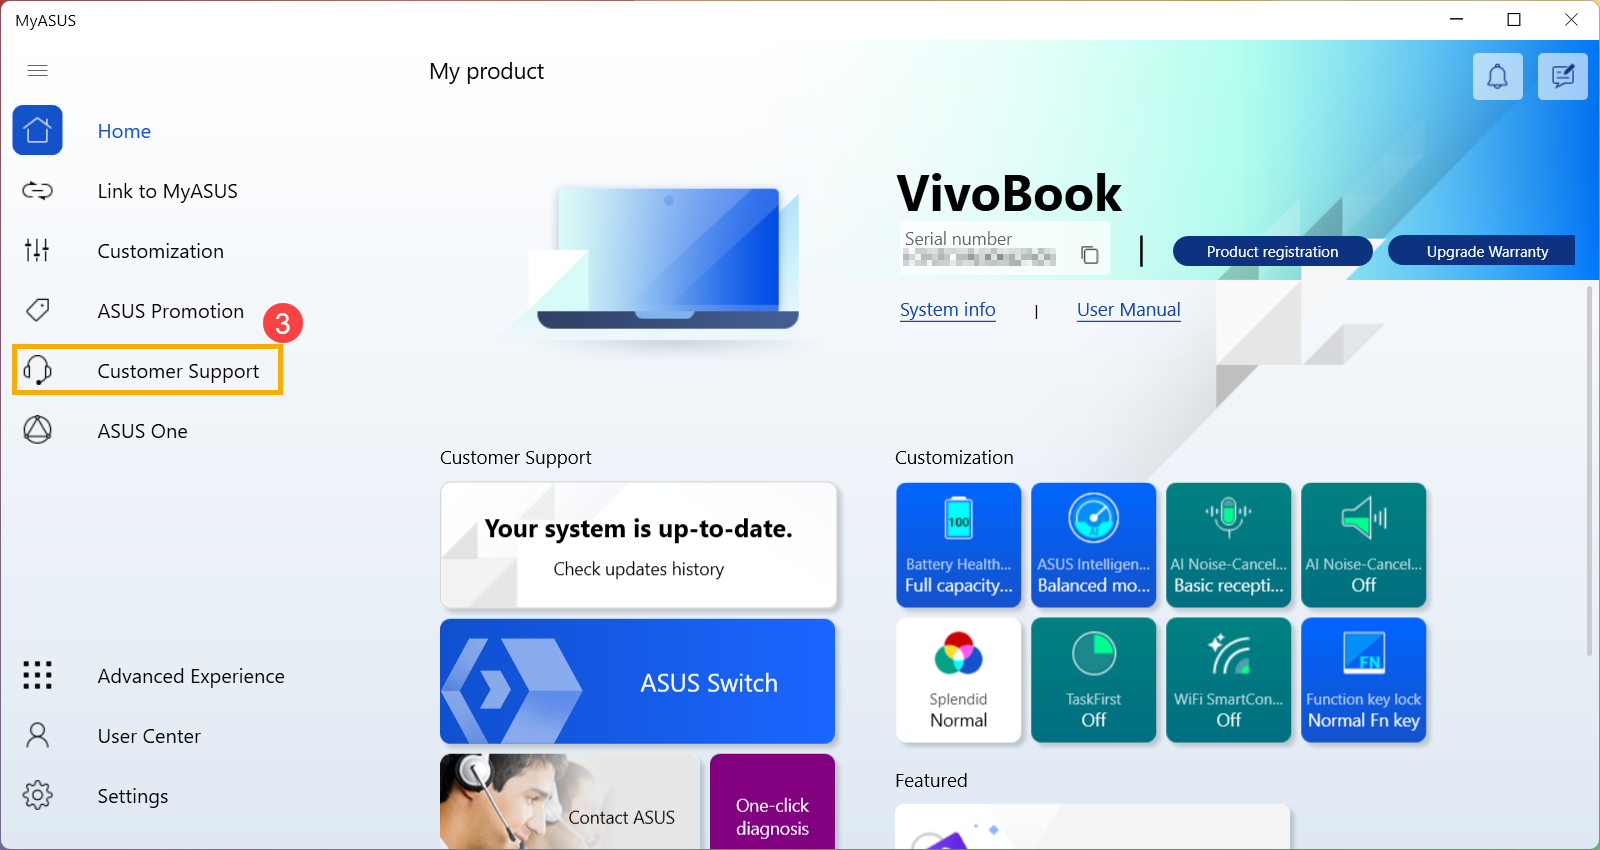
- In MyASUS, select [Customer Support] ③ .
- Select [Live Update] ④ , and then select [Latest] ⑤ , here you can learn more about MyASUS – Customer Support introduction.
Note: If there is no Live Update tab in MyASUS that means your computer does not support this function, please go to Method 2: Download the BIOS file from ASUS support site. Here you can learn more about Why can I only see the “Customer Support” feature in the MyASUS app.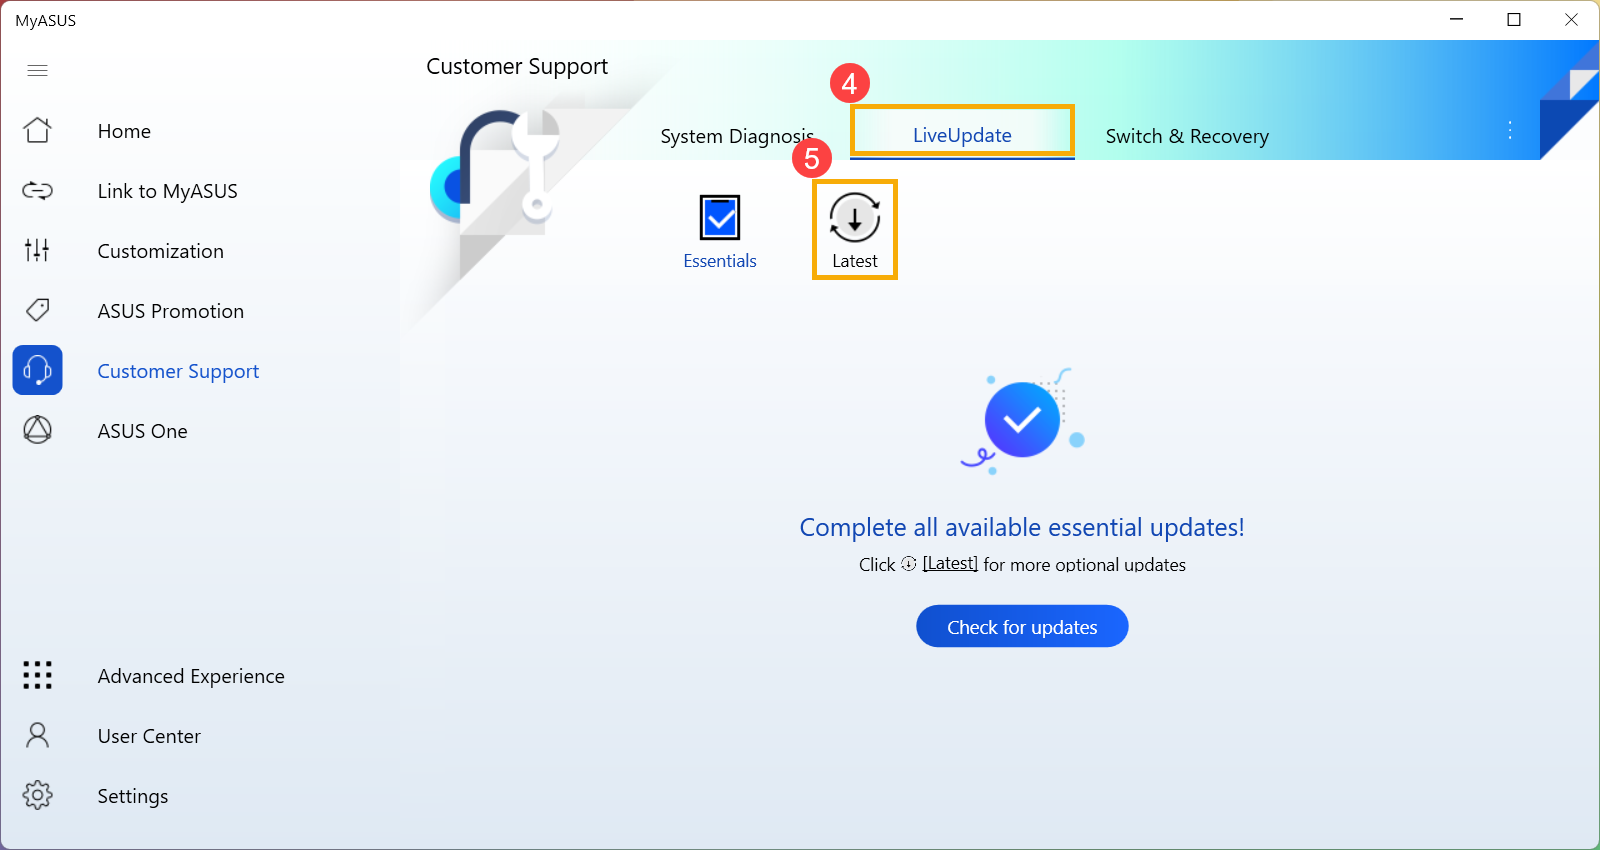
- Please search for [BIOS for ASUS EZ Flash Utility] or [BIOS version] file which is located in the BIOS category ⑥ . If you can see the file, please click [Download
 ] ⑦ , then go to the Appendix: How to use EZ Flash to update BIOS.
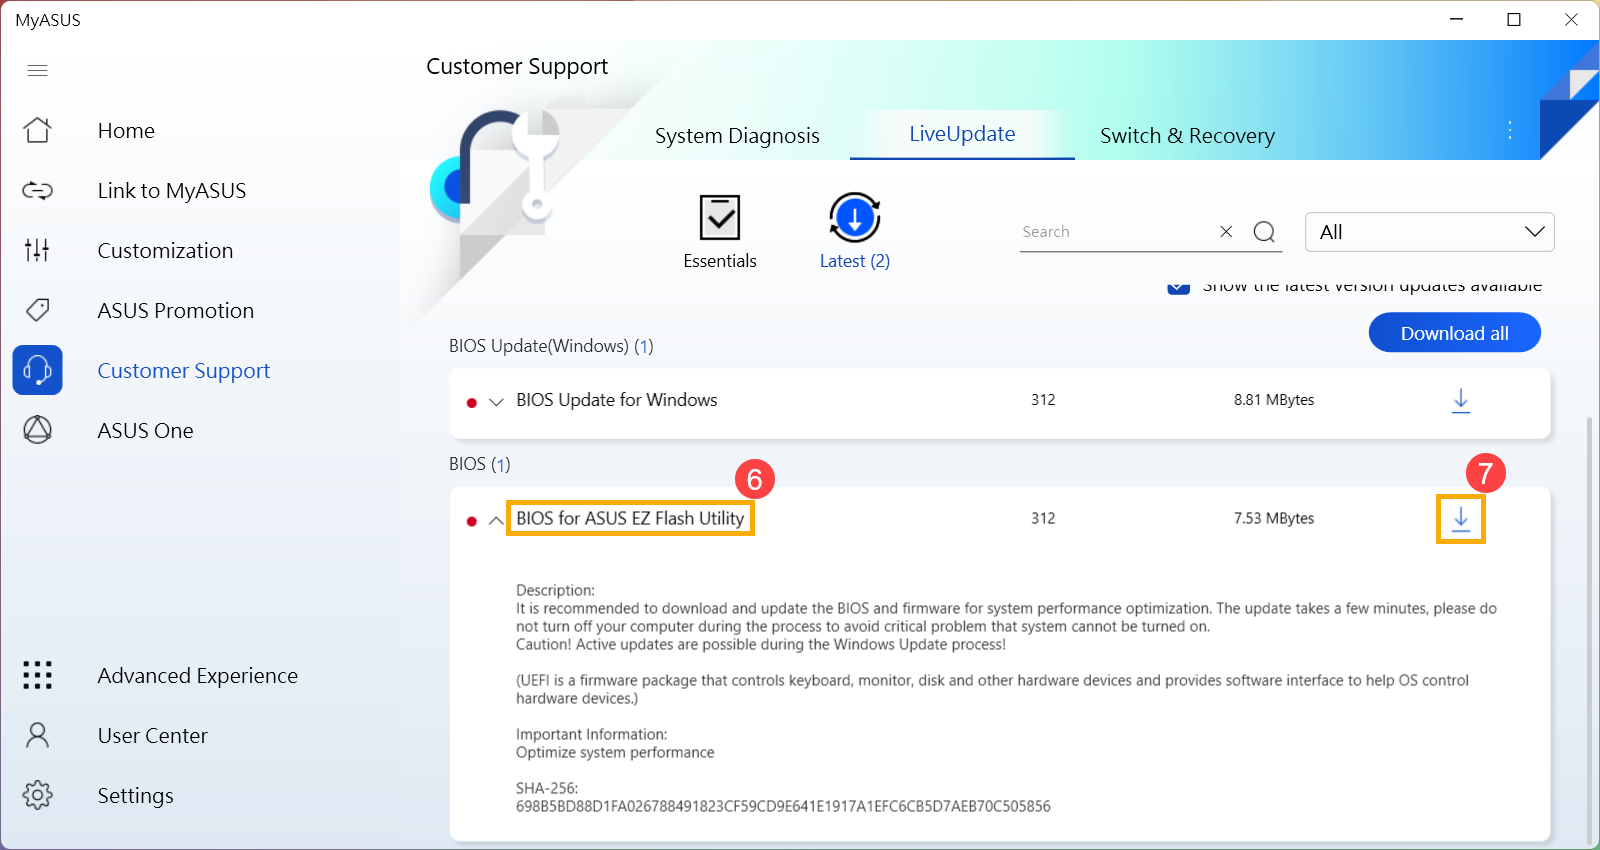

- Go to the ASUS support site with your computer’s model name, here you can learn more about How to search and download BIOS.
Note: To download the corresponding BIOS file, please refer to How to check the model name. - In the support page, please search for [BIOS for ASUS EZ Flash Utility] or [BIOS version] file which is located in the BIOS category ① . If you are able to see the file, please click [Download] ② , then go to the appendix: How to use EZ Flash to update BIOS.
- Save BIOS file to portable storage device
- How to use EZ Flash to update BIOS in UEFI mode
- How to use EZ Flash to update BIOS in Legacy mode
Before starting to use EZ Flash to update BIOS, please extract the downloaded BIOS file, and then copy the extracted file to a portable storage device (USB flash drive or external hard drive).
Note: The USB flash drive format must be FAT32 so that you are able to update BIOS in the BIOS utility. Here you can learn more about How to convert the USB flash drive format to FAT32.
- After downloading the BIOS file, right-click the file ① and then select [Extract All] ② .
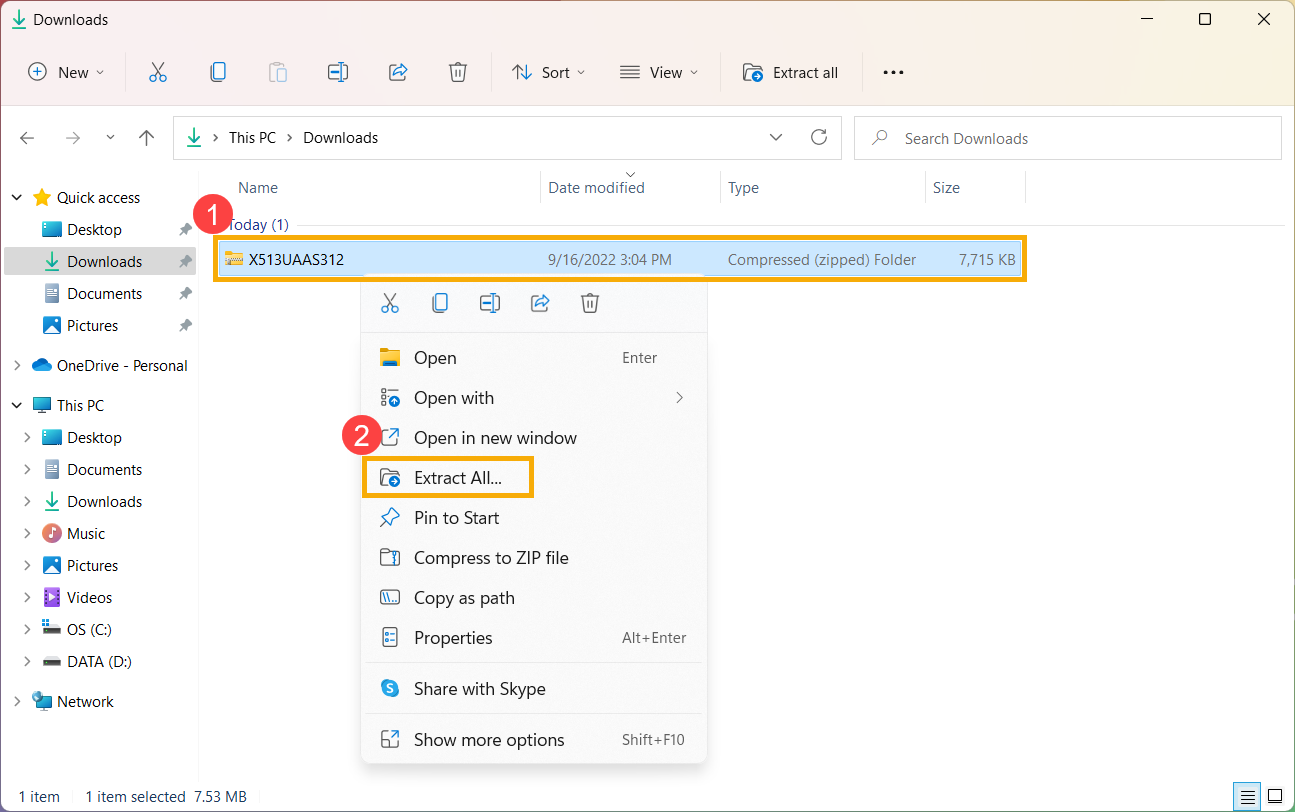
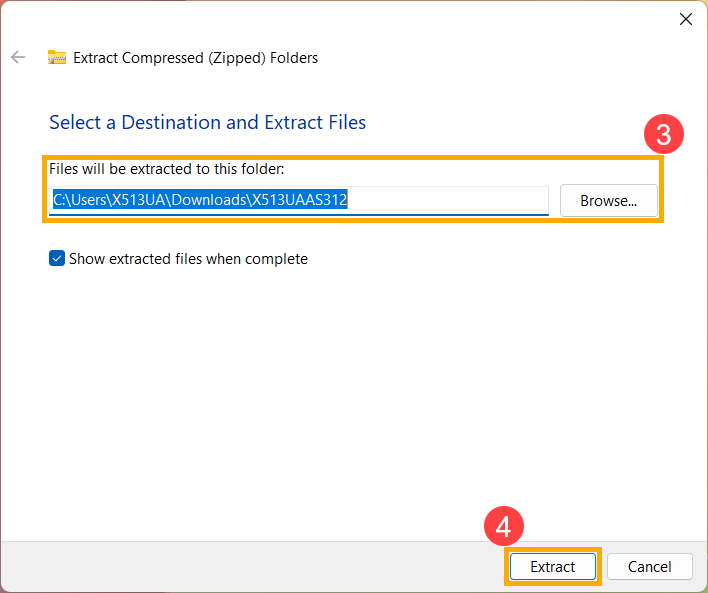
- Select a Destination ③ and then click [Extract] ④ .
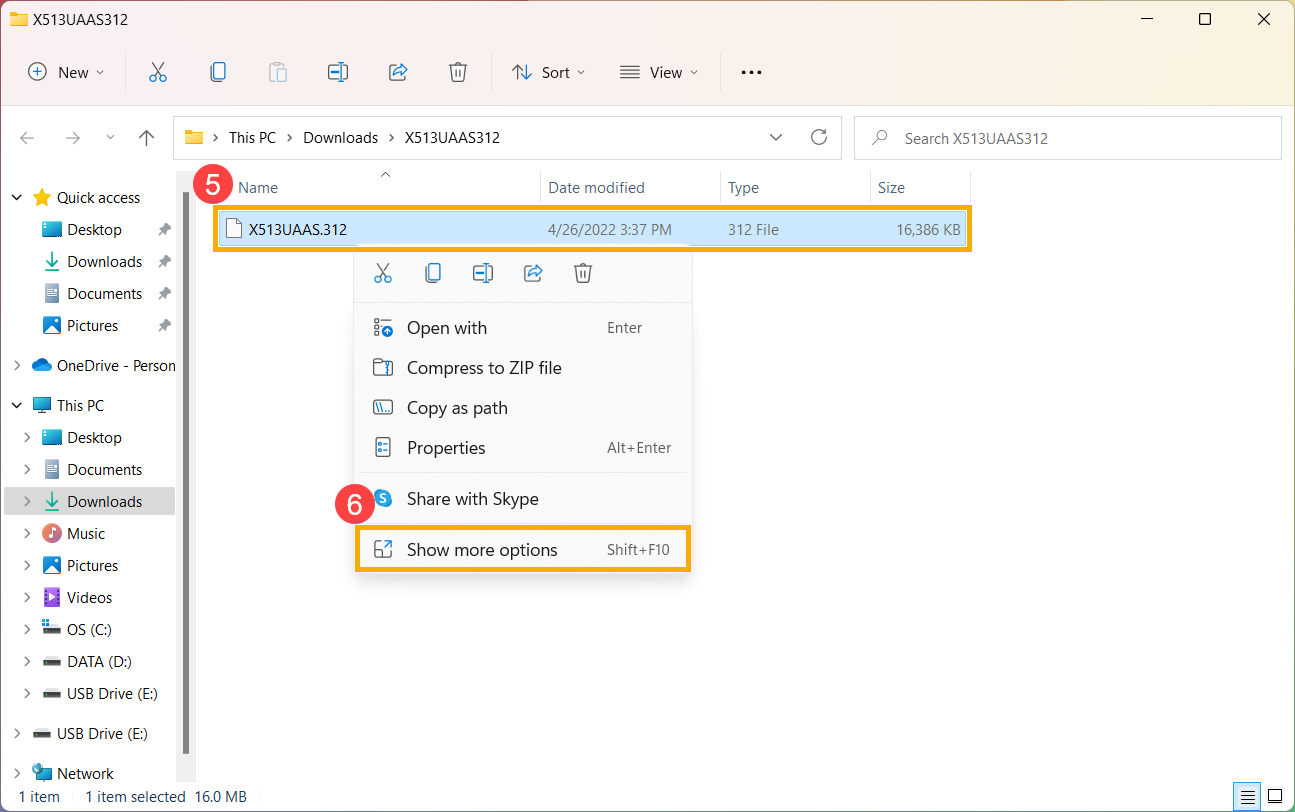
- After the extraction is completed, please go to the folder and connect the portable storage device to your computer. Right-click the BIOS file ⑤ , then select [Show more options] ⑥ .
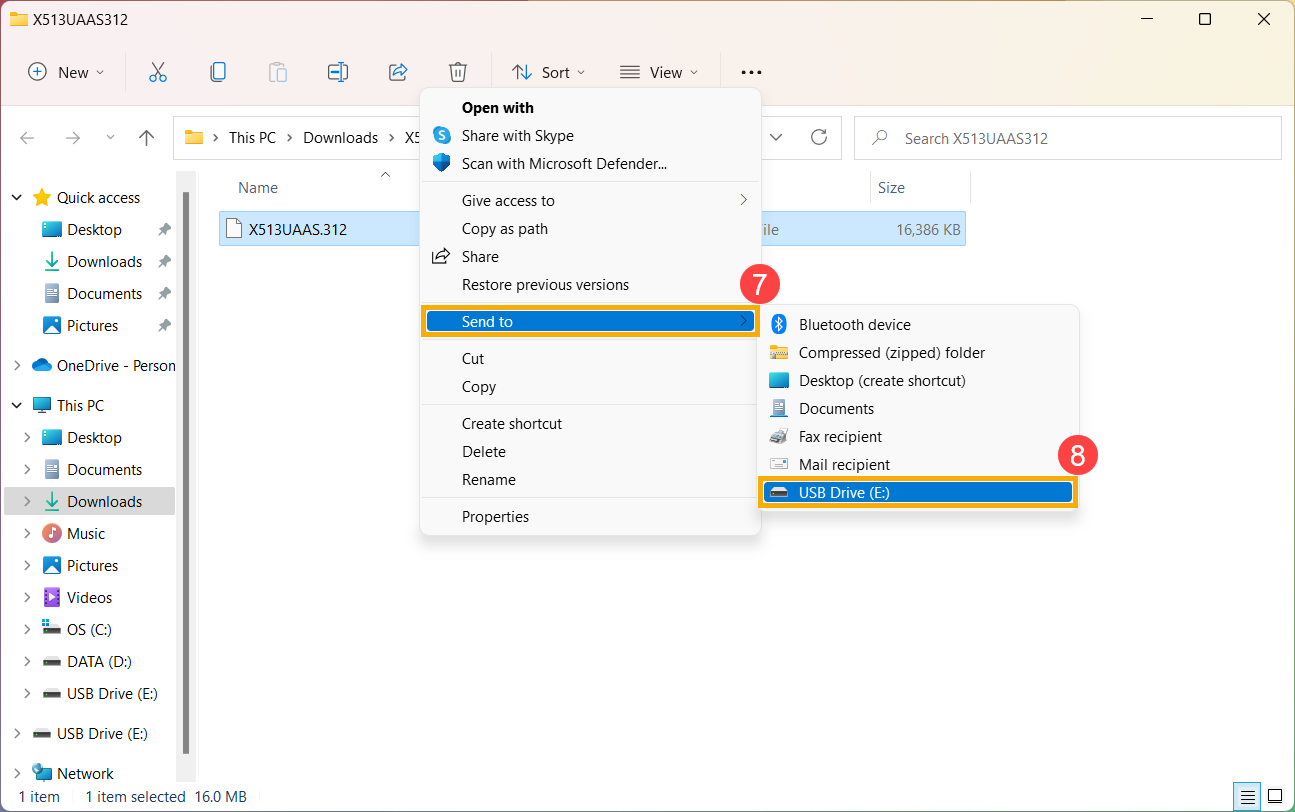
- Select [Send to] ⑦ , then select [Your portable device] ⑧ .
- The preparation is finished, please enters the BIOS Utility. Here you can learn more about How to enter the BIOS Utility.
- After entering the BIOS Utility, please go to the next appendix: How to use EZ Flash to update BIOS in UEFI mode.
In UEFI mode, you are able to select and choose the item via Arrow Keys and Enter of keyboard, Touchpad or Mouse.
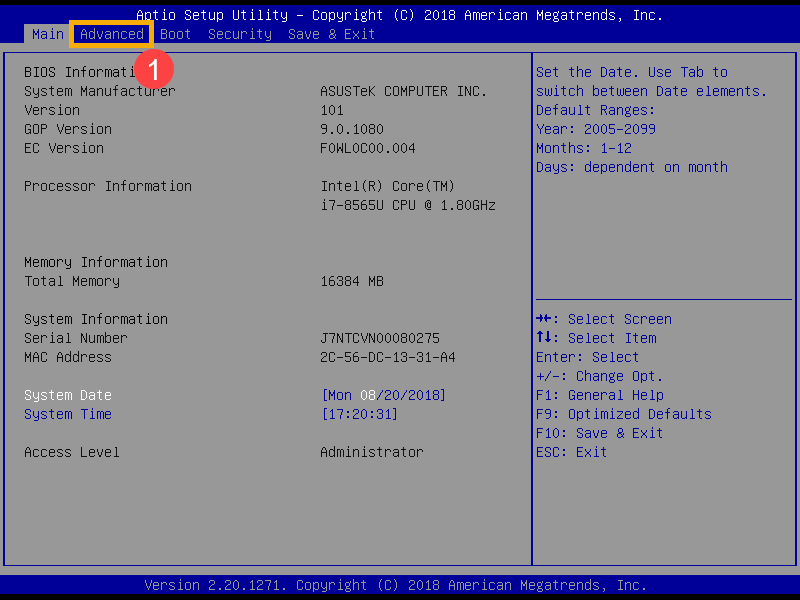
- After entering the BIOS Utility, go to the Advanced Mode by pressing Hotkey[F7] or use cursor to click ① .
Note: If your BIOS Utility screen is not like below, please refer to appendix: How to use EZ Flash to update BIOS in Legacy mode.
Note: If your computer uses MyASUS in UEFI BIOS, such as Intel 12th Gen Intel® Core™ processors(Alder lake), AMD’s Ryzen 6000 processors(Rembrandt), or later, please refer to How to update BIOS with MyASUS in UEFI BIOS introduction.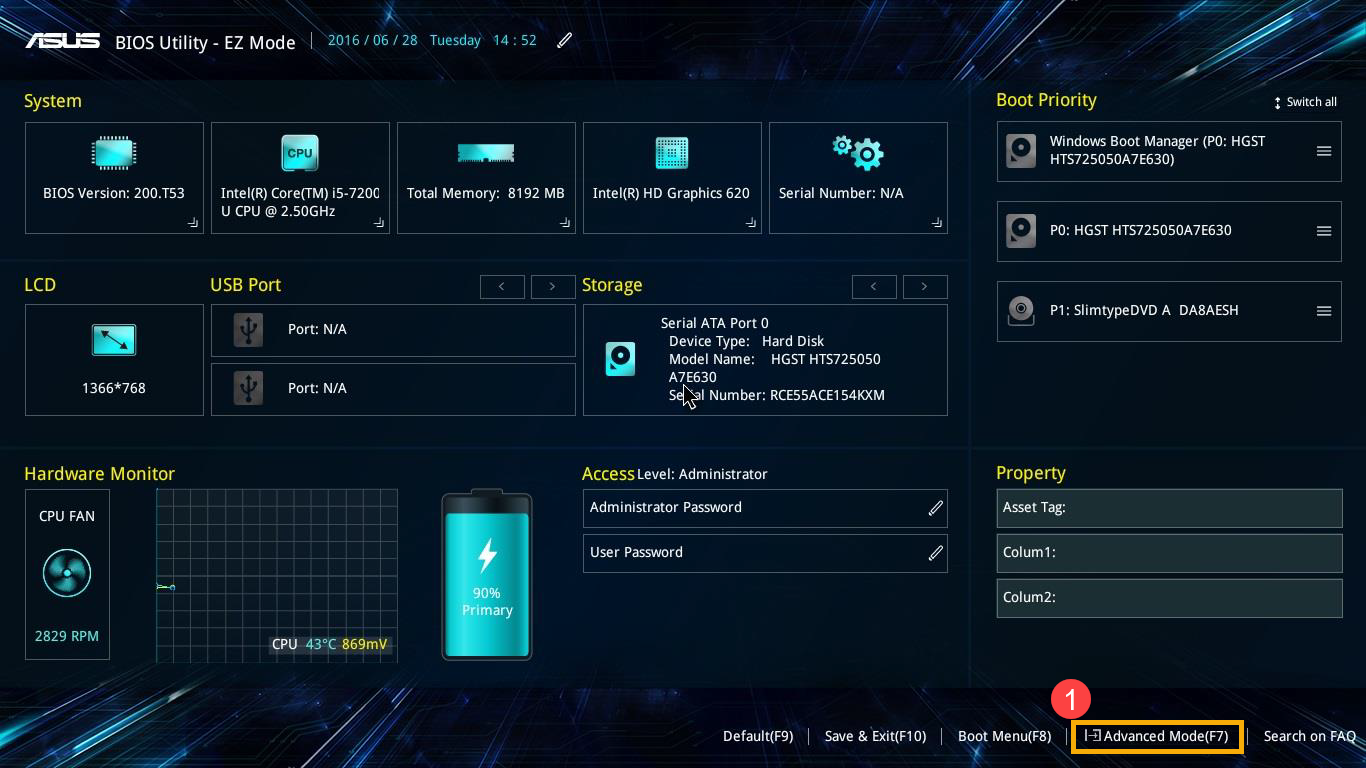
- After entering the Advanced Mode, select [Advanced] screen ② .
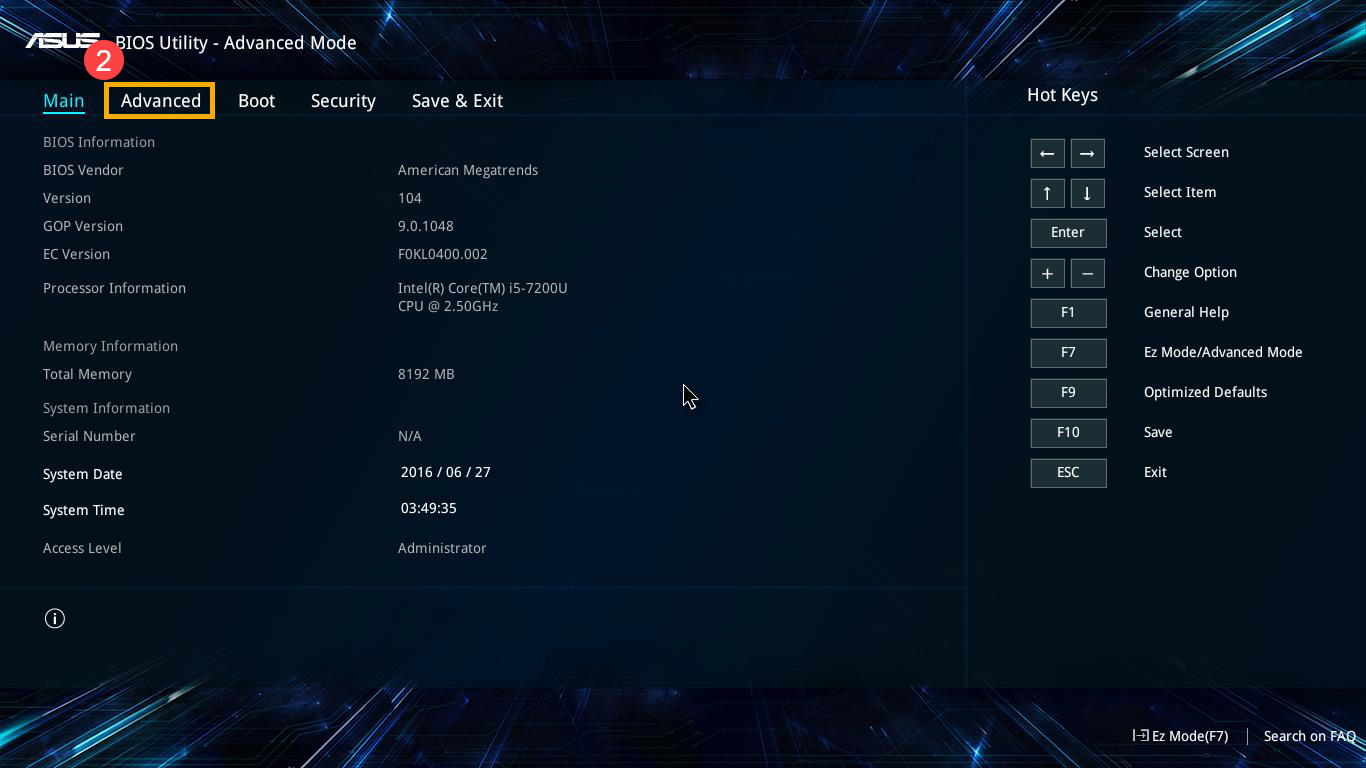
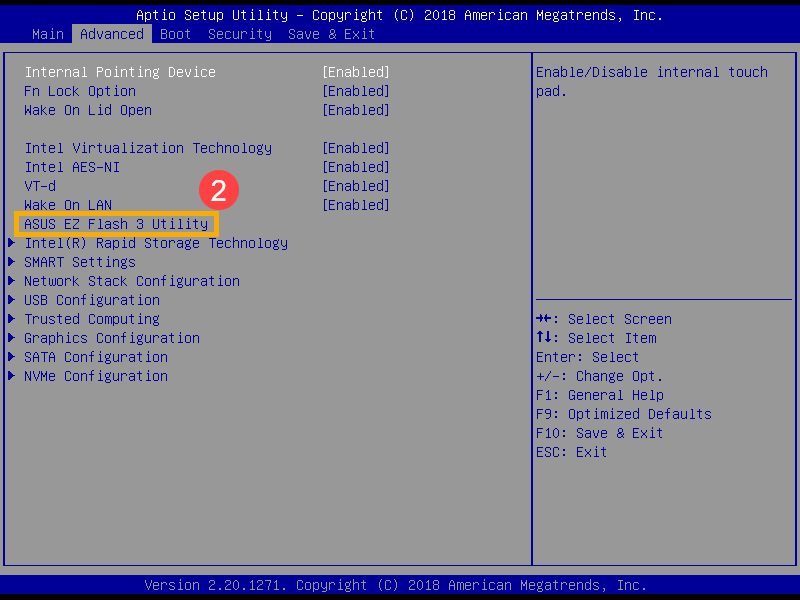
- Select [ASUS EZ Flash 3 Utility] item ③ .
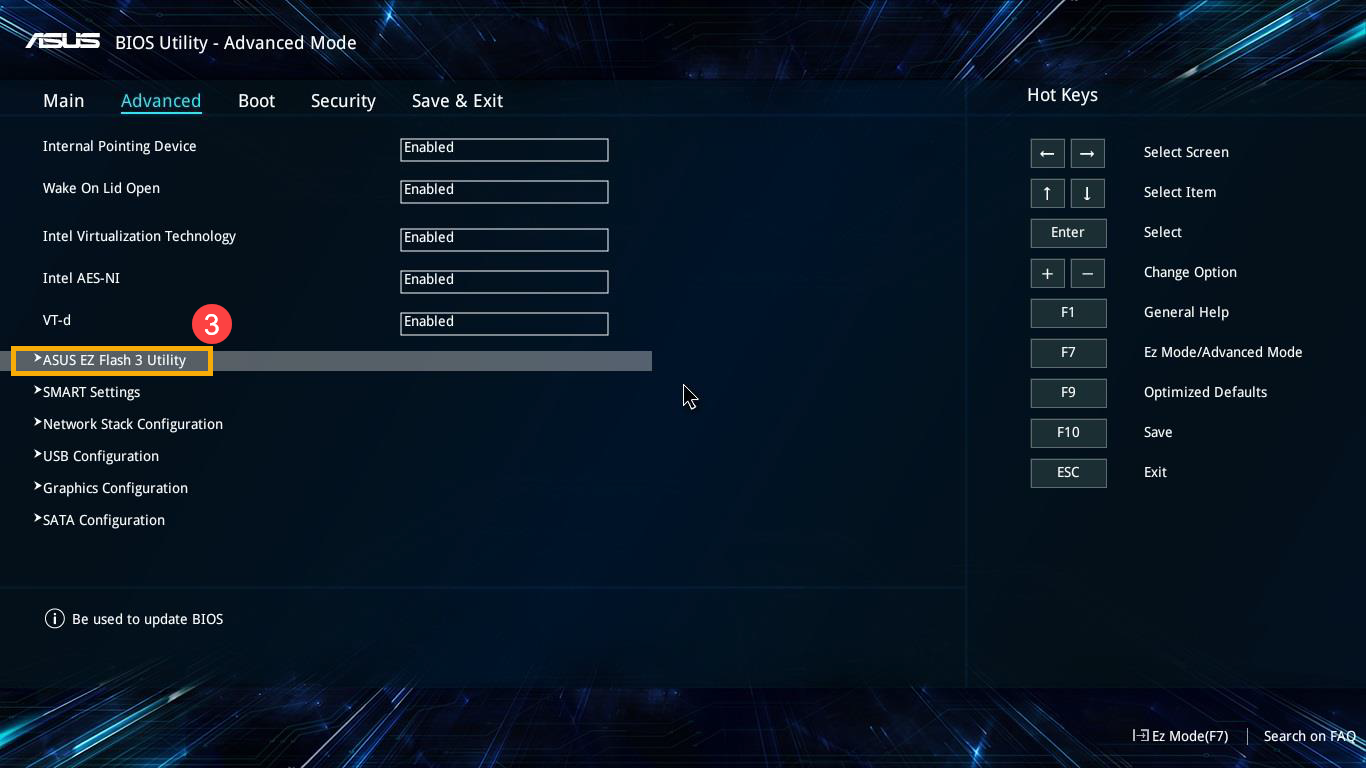
- Select the storage device where the BIOS file located ④ , then click the BIOS file ⑤ .
The naming rule of BIOS files is defined as “Model”AS.”BIOS version”. Such as “B9450FAAS.302”. For example below, the model is B9450FA, and the BIOS version is 302.
Note: The system can only execute BIOS update when the AC adapter connected and Battery power capacity should be over 20%.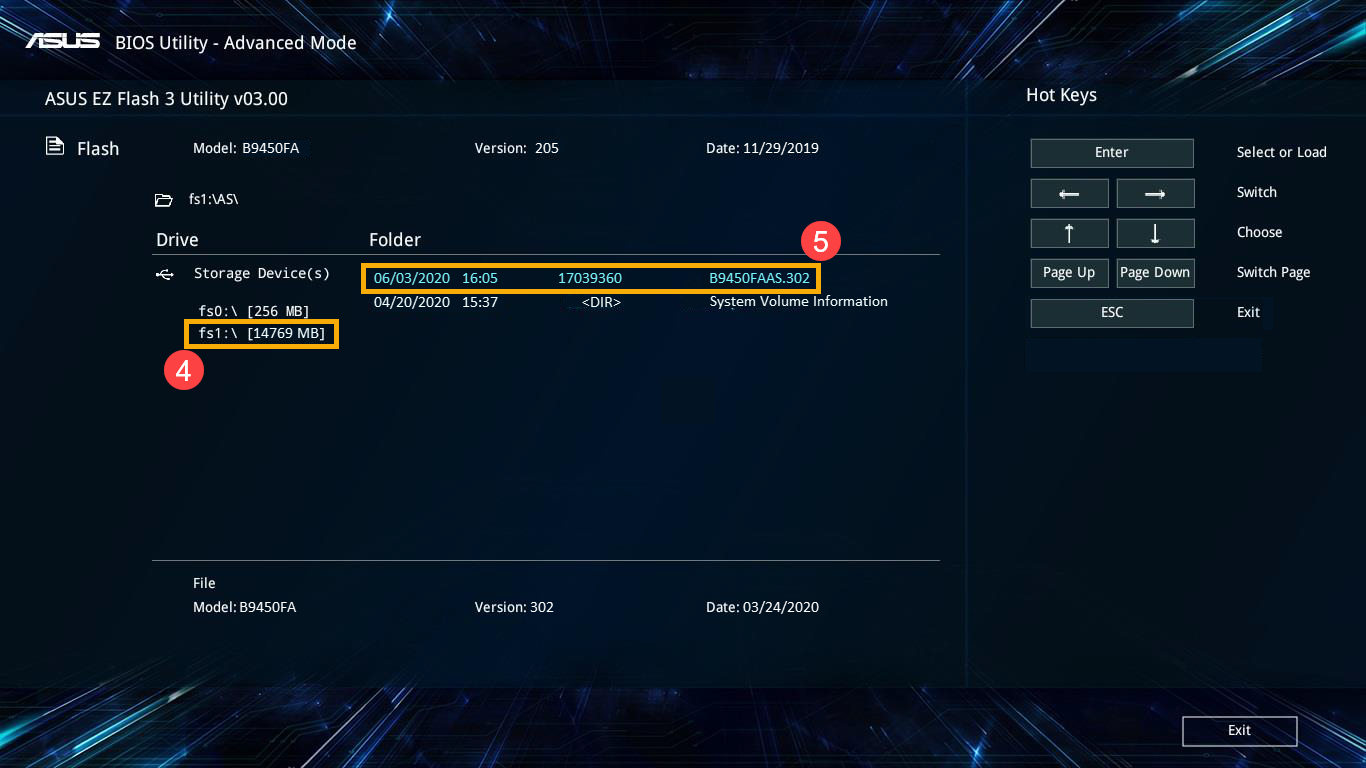
- Confirm the BIOS file, and click [Yes] ⑥ to update BIOS.
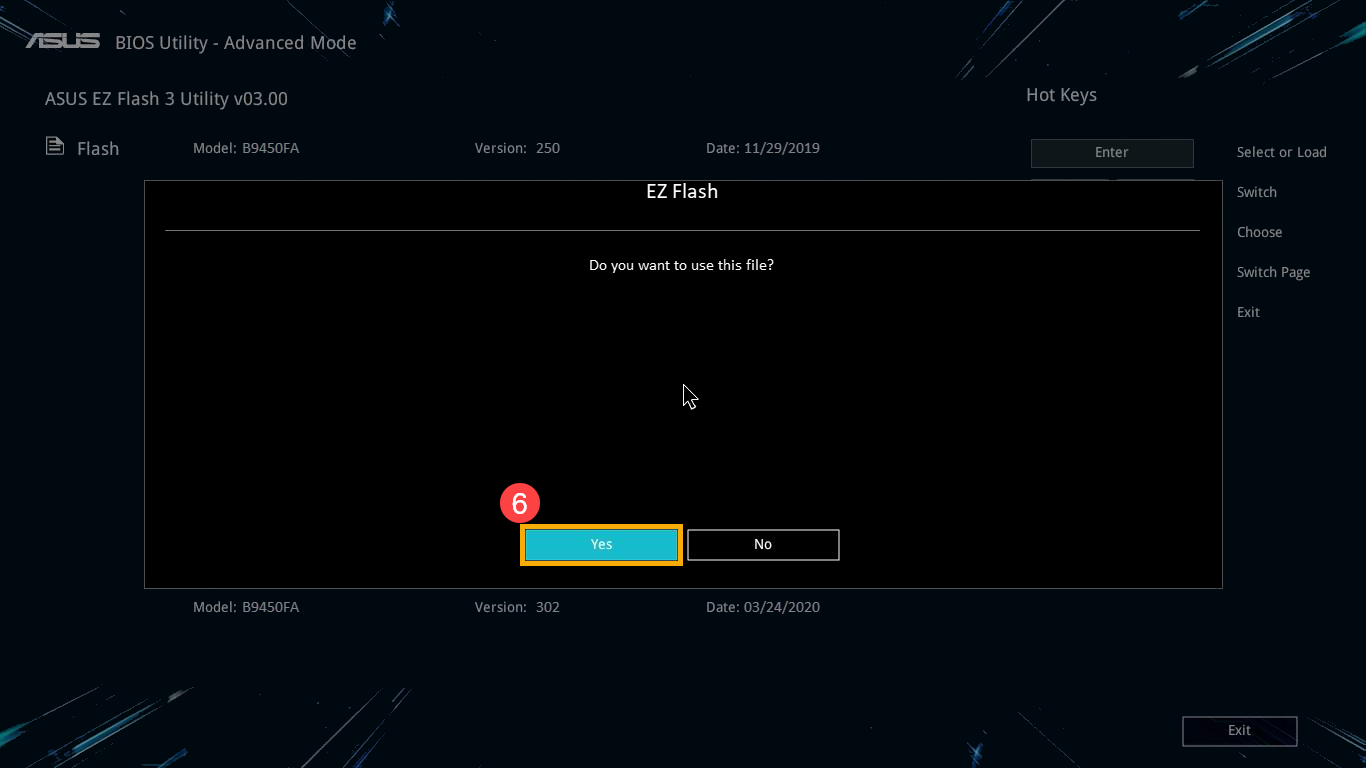
- Confirm the BIOS information , then click [Yes] ⑦ .

- When BIOS update is processing, please be patient till the BIOS update process is completed, and then the computer will auto-reboot.
Note: Please make sure that the AC adapter is connected during the BIOS updating process on your unit. Also, please do not force shut down during the update process to prevent any issue.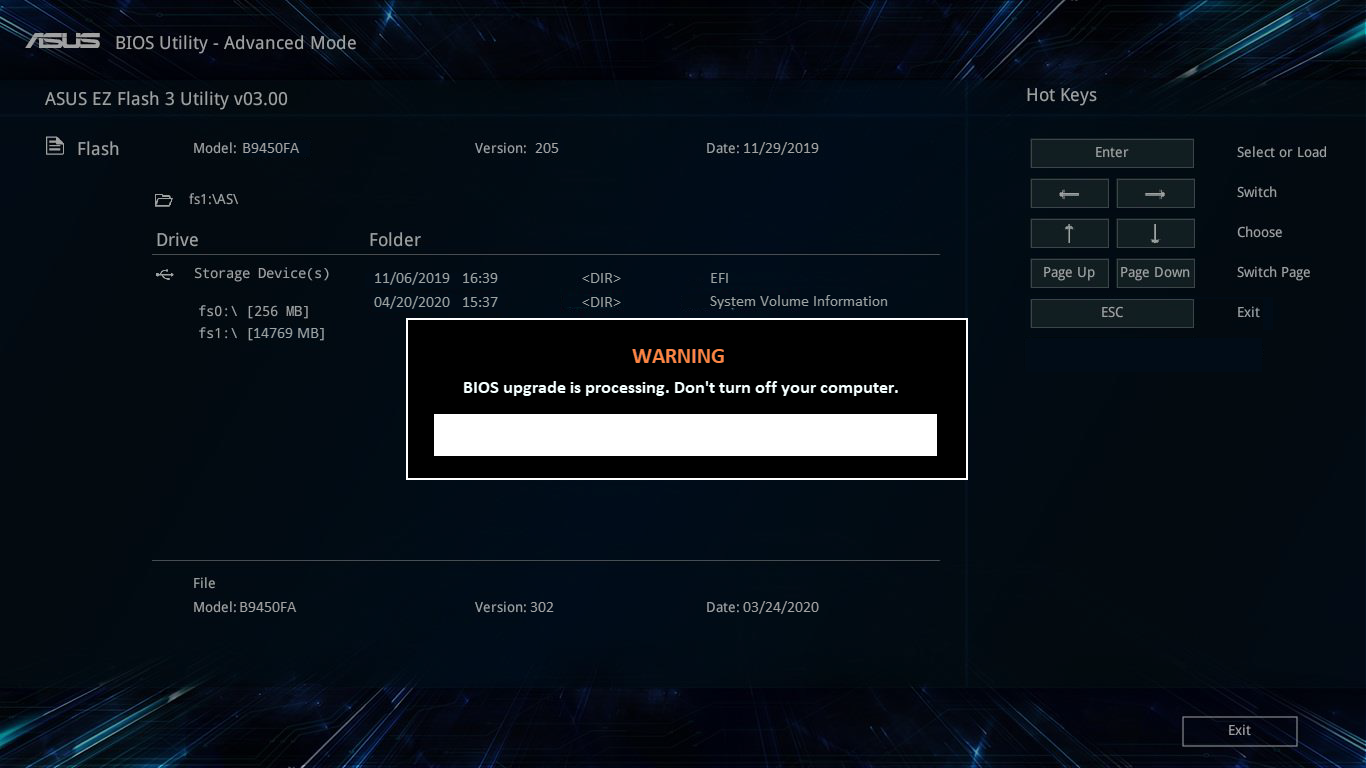
- After the computer gets into Windows, it means the BIOS has been successfully updated. Here you can learn more about How to check the BIOS version to check whether BIOS is updated successfully.
In Legacy mode, you can only select and choose item via Arrow Keys and Enter of keyboard.
- After entering the BIOS Utility, select [Advanced] screen ① .
- Select [ASUS EZ Flash 3 Utility] item and press Enter ② .
- Select the storage device where the BIOS file located ③ , then select the BIOS file ④ .
The naming rule of BIOS files define as “Model”AS.”BIOS version”. Such as“UX32LNAS.203”. For example below, the model is UX32LN, and the BIOS version is 203.
Note: The system can only update BIOS when the AC adapter connected and Battery power capacity should be over 20%.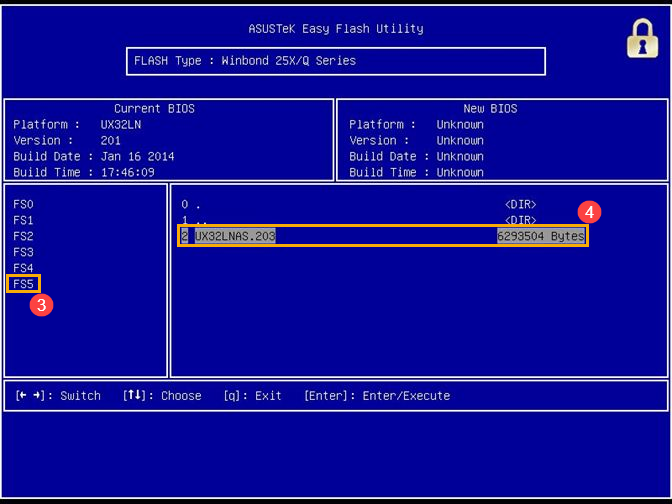
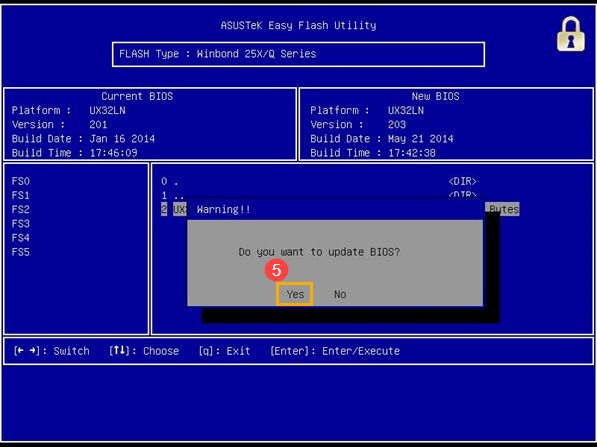
- Select [Yes] and press Enter to confirm and update BIOS ⑤ .
- When BIOS update is processing, please be patient till the BIOS update process is completed, and then the computer will auto-reboot.
Note: Please make sure that the AC adapter is connected during the BIOS updating process on your unit. Also, please do not force shut down during the update process to prevent any issue.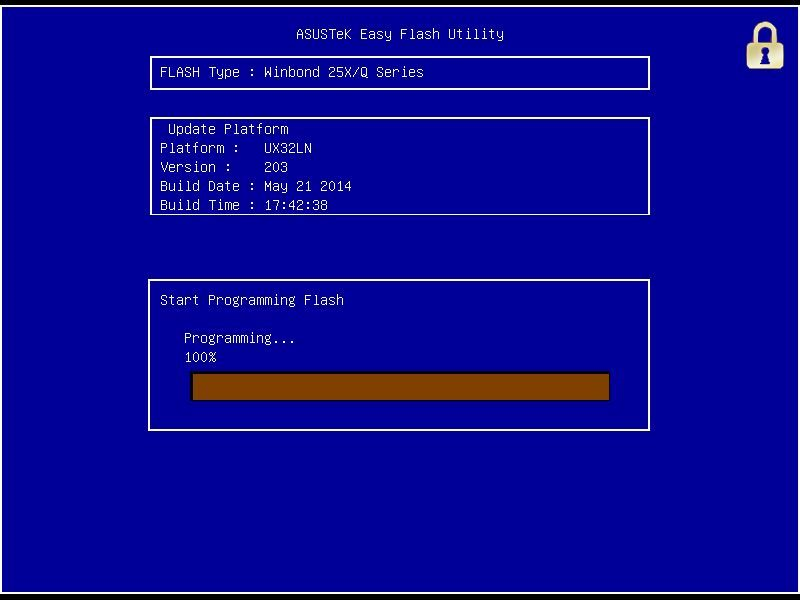
- After the computer enters the Windows, it means the BIOS has been successfully updated. Here you can learn more about How to check the BIOS version to check whether BIOS is updated successfully.
[Notebook/AIO] How to update BIOS with EZ Flash
- Type and search [MyASUS] in the Windows search bar ① , then click [Open] ② . (The left-side search illustration below is in Windows 11, and the right-side is Windows 10.)
If there is no result searched , that means your computer may not install it. Please refer to How to install MyASUS. - In MyASUS, select [Customer Support] ③ .
- Select [Live Update] ④ , and then select [Latest] ⑤ , here you can learn more about MyASUS – Customer Support introduction.
Note: If there is no Live Update tab in MyASUS that means your computer does not support this function, please go to Method 2: Download the BIOS file from ASUS support site. Here you can learn more about Why can I only see the “Customer Support” feature in the MyASUS app. - Please search for [BIOS for ASUS EZ Flash Utility] or [BIOS version] file which is located in the BIOS category ⑥ . If you can see the file, please click [Download] ⑦ , then go to the Appendix: How to use EZ Flash to update BIOS.
- Go to the ASUS support site with your computer’s model name, here you can learn more about How to search and download BIOS.
Note: To download the corresponding BIOS file, please refer to How to check the model name. - In the support page, please search for [BIOS for ASUS EZ Flash Utility] or [BIOS version] file which is located in the BIOS category ① . If you are able to see the file, please click [Download] ② , then go to the appendix: How to use EZ Flash to update BIOS.
- Save BIOS file to portable storage device
- How to use EZ Flash to update BIOS in UEFI mode
- How to use EZ Flash to update BIOS in Legacy mode
Before starting to use EZ Flash to update BIOS, please extract the downloaded BIOS file, and then copy the extracted file to a portable storage device (USB flash drive or external hard drive).
Note: The USB flash drive format must be FAT32 so that you are able to update BIOS in the BIOS utility. Here you can learn more about How to convert the USB flash drive format to FAT32.
- After downloading the BIOS file, right-click the file ① and then select [Extract All] ② .
- Select a Destination ③ and then click [Extract] ④ .
- After the extraction is completed, please go to the folder and connect the portable storage device to your computer. Right-click the BIOS file ⑤ , then select [Show more options] ⑥ .
- Select [Send to] ⑦ , then select [Your portable device] ⑧ .
- The preparation is finished, please enters the BIOS Utility. Here you can learn more about How to enter the BIOS Utility.
- After entering the BIOS Utility, please go to the next appendix: How to use EZ Flash to update BIOS in UEFI mode.
In UEFI mode, you are able to select and choose the item via Arrow Keys and Enter of keyboard, Touchpad or Mouse.
- After entering the BIOS Utility, go to the Advanced Mode by pressing Hotkey[F7] or use cursor to click ① .
Note: If your BIOS Utility screen is not like below, please refer to appendix: How to use EZ Flash to update BIOS in Legacy mode.
Note: If your computer uses MyASUS in UEFI BIOS, such as Intel 12th Gen Intel® Core™ processors(Alder lake), AMD’s Ryzen 6000 processors(Rembrandt), or later, please refer to How to update BIOS with MyASUS in UEFI BIOS introduction. - After entering the Advanced Mode, select [Advanced] screen ② .
- Select [ASUS EZ Flash 3 Utility] item ③ .
- Select the storage device where the BIOS file located ④ , then click the BIOS file ⑤ .
The naming rule of BIOS files is defined as “Model”AS.”BIOS version”. Such as “B9450FAAS.302”. For example below, the model is B9450FA, and the BIOS version is 302.
Note: The system can only execute BIOS update when the AC adapter connected and Battery power capacity should be over 20%. - Confirm the BIOS file, and click [Yes] ⑥ to update BIOS.
- Confirm the BIOS information , then click [Yes] ⑦ .
- When BIOS update is processing, please be patient till the BIOS update process is completed, and then the computer will auto-reboot.
Note: Please make sure that the AC adapter is connected during the BIOS updating process on your unit. Also, please do not force shut down during the update process to prevent any issue. - After the computer gets into Windows, it means the BIOS has been successfully updated. Here you can learn more about How to check the BIOS version to check whether BIOS is updated successfully.
In Legacy mode, you can only select and choose item via Arrow Keys and Enter of keyboard.
- After entering the BIOS Utility, select [Advanced] screen ① .
- Select [ASUS EZ Flash 3 Utility] item and press Enter ② .
- Select the storage device where the BIOS file located ③ , then select the BIOS file ④ .
The naming rule of BIOS files define as “Model”AS.”BIOS version”. Such as“UX32LNAS.203”. For example below, the model is UX32LN, and the BIOS version is 203.
Note: The system can only update BIOS when the AC adapter connected and Battery power capacity should be over 20%. - Select [Yes] and press Enter to confirm and update BIOS ⑤ .
- When BIOS update is processing, please be patient till the BIOS update process is completed, and then the computer will auto-reboot.
Note: Please make sure that the AC adapter is connected during the BIOS updating process on your unit. Also, please do not force shut down during the update process to prevent any issue. - After the computer enters the Windows, it means the BIOS has been successfully updated. Here you can learn more about How to check the BIOS version to check whether BIOS is updated successfully.
Как обновить биос на ноутбуке асус с флешки

На смену традиционным системам BIOS в материнских платах пришла современная система UEFI. Интерфейс нового UEFI BIOS теперь напоминает обычное программное приложение и является более удобным за счёт использования удобного визуального интерфейса и возможности использования не только клавиатуры, но и мышки.
В таких материнских платах для обновления BIOS удобнее всего воспользоваться специальной утилитой ASUS EZ Flash 2 уже встроенной в материнскую плату.
Если Ваше устройство ASUS реализовано на более старой версии BIOS (без утилиты ASUS EZ Flash ), то воспользуйтесь инструкцией Как прошить BIOS ASUS (утилита AFUDOS)
Пошаговая инструкция прошивки (обновления) BIOS с помощью ASUS EZ Flash 2 :
Перед прошивкой обязательно нужно позаботиться об электрическом обеспечении устройства. Если во время процесса прошивки система будет обесточена BIOS будет повреждён. Поэтому постарайтесь подключить ПК к источнику бесперебойного питания или зарядите полностью аккумулятор (в случае прошивки ноутбука)
1. Для начала необходимо скачать подходящую версию прошивки BIOS с официального сайта ASUS и сохранить её на внешнем носителе (с которого будет осуществляться прошивка) в разархивированном виде (зачастую с расширением .CAB)
2. Зайти в BIOS. Для этого перезагрузить устройство и при его включении удерживать кнопку DEL (для персональных компьютеров) или F2 (для ноутбуков).
3. Проверив текущую версию BIOS перейти на вкладу дополнительных свойств, нажав кнопку “Advansed mode” (Дополнительно) или кнопку F7.

4. В расширенном режиме BIOS перейти на вкладку “Tool” (Сервис)

5. На сервисной вкладке выбрать утилиту ASUS EZ Flash 2

6. В интерфейсе программы ASUS EZ Flash 2 ещё раз проверить текущую версию BIOS и затем выбрав подготовленный носитель с прошивкой – в левой части экрана. Выбрать в правой части экрана файл новой версии BIOS.

7. Подтвердить согласие на на проверку файла прошивки.

8. После проверки нужно дать согласие на прошивку BIOS.

9. Дождаться окончания процесса прошивки (полоса прогресса процесса отображается снизу).

10. После удачной прошивки BIOS будет выдано сообщение, предлагающее перезагрузку. Согласиться, нажав OK.

11. При первом запуске после прошивки BIOS, система предложит произвести первичную настройку. Необходимо проверить текущую версию BIOS – она должна соответствовать выбранной для прошивки. Нажать F1 и произвести нужную настройку или просто выйти из настроек.

На этом прошивка BIOS материнской платы производства ASUS завершена.
При подготовке материала использовались источники:
https://www.asus.com/support/FAQ/1008859/
https://www.asus.com/dk/support/FAQ/1008859/
https://pontin.ru/technical/firmware/kak-proshit-bios-asus-ez-flash-2