 Онлайн Радио 24
 chkdsk
Checks the file system and file system metadata of a volume for logical and physical errors. If used without parameters, chkdsk displays only the status of the volume and does not fix any errors. If used with the /f, /r, /x, or /b parameters, it fixes errors on the volume.
Membership in the local Administrators group, or equivalent, is the minimum required to run chkdsk. To open a command prompt window as an administrator, right-click Command prompt in the Start menu, and then click Run as administrator.
Interrupting chkdsk is not recommended. However, canceling or interrupting chkdsk should not leave the volume any more corrupt than it was before chkdsk was run. Running chkdsk again checks and should repair any remaining corruption on the volume.
Chkdsk can be used only for local disks. The command cannot be used with a local drive letter that has been redirected over the network.
Syntax
chkdsk [[[]]] [/f] [/v] [/r] [/x] [/i] [/c] [/l[:]] [/b] Parameters
| Parameter | Description |
|---|---|
| Specifies the drive letter (followed by a colon), mount point, or volume name. | |
| [ [] | Use with file allocation table (FAT) and FAT32 only. Specifies the location and name of a file or set of files that you want chkdsk to check for fragmentation. You can use the ? and * wildcard characters to specify multiple files. |
| /f | Fixes errors on the disk. The disk must be locked. If chkdsk cannot lock the drive, a message appears that asks you if you want to check the drive the next time you restart the computer. |
| /v | Displays the name of each file in every directory as the disk is checked. |
| /r | Locates bad sectors and recovers readable information. The disk must be locked. /r includes the functionality of /f, with the additional analysis of physical disk errors. |
| /x | Forces the volume to dismount first, if necessary. All open handles to the drive are invalidated. /x also includes the functionality of /f. |
| /i | Use with NTFS only. Performs a less vigorous check of index entries, which reduces the amount of time required to run chkdsk. |
| /c | Use with NTFS only. Does not check cycles within the folder structure, which reduces the amount of time required to run chkdsk. |
| /l[: ] | Use with NTFS only. Changes the log file size to the size you type. If you omit the size parameter, /l displays the current size. |
| /b | Use with NTFS only. Clears the list of bad clusters on the volume and rescans all allocated and free clusters for errors. /b includes the functionality of /r. Use this parameter after imaging a volume to a new hard disk drive. |
| /scan | Use with NTFS only. Runs an online scan on the volume. |
| /forceofflinefix | Use with NTFS only (must be used with /scan). Bypass all online repair; all defects found are queued for offline repair (for example, chkdsk /spotfix ). |
| /perf | Use with NTFS only (must be used with /scan). Uses more system resources to complete a scan as fast as possible. This may have a negative performance impact on other tasks running on the system. |
| /spotfix | Use with NTFS only. Runs spot fixing on the volume. |
| /sdcleanup | Use with NTFS only. Garbage collect unneeded security descriptor data (implies /f). |
| /offlinescanandfix | Runs an offline scan and fix on the volume. |
| /freeorphanedchains | Use with FAT/FAT32/exFAT only. Frees any orphaned cluster chains instead of recovering their contents. |
| /markclean | Use with FAT/FAT32/exFAT only. Marks the volume clean if no corruption was detected, even if /f was not specified. |
| /? | Displays help at the command prompt. |
Remarks
- The /i or /c switch reduces the amount of time required to run chkdsk by skipping certain volume checks.
- If you want chkdsk to correct disk errors, you can’t have open files on the drive. If files are open, the following error message appears:
Chkdsk cannot run because the volume is in use by another process. Would you like to schedule this volume to be checked the next time the system restarts? (Y/N) 10 lost allocation units found in 3 chains. Convert lost chains to files? - If you press Y, Windows saves each lost chain in the root directory as a file with a name in the format File .chk. When chkdsk finishes, you can check these files to see if they contain any data you need.
- If you press N, Windows fixes the disk, but it does not save the contents of the lost allocation units.
Understanding exit codes
The following table lists the exit codes that chkdsk reports after it has finished.
| Exit code | Description |
|---|---|
| 0 | No errors were found. |
| 1 | Errors were found and fixed. |
| 2 | Performed disk cleanup (such as garbage collection) or did not perform cleanup because /f was not specified. |
| 3 | Could not check the disk, errors could not be fixed, or errors were not fixed because /f was not specified. |
Examples
To check the disk in drive D and have Windows fix errors, type:
chkdsk d: /f If it encounters errors, chkdsk pauses and displays messages. Chkdsk finishes by displaying a report that lists the status of the disk. You cannot open any files on the specified drive until chkdsk finishes.
To check all files on a FAT disk in the current directory for noncontiguous blocks, type:
chkdsk *.* Chkdsk displays a status report, and then lists the files that match the file specifications that have noncontiguous blocks.
Viewing chkdsk logs
There are two methods that can be used to retrieve chkdsk log file(s) in Windows. View the methods described below:
To view logs with Event Viewer, navigate to the following:
- Start >Control Panel >Administrative Tools >Event Viewer. Alternatively, press Win + R keys to bring up the run dialog box, type eventvwr.msc, and select OK.
- Expand Windows Logs > right-click on Application > select Filter Current Log.
- Within the Filter Current Log window, navigate to Event sources drop-down menu, select Chkdsk and Wininit.
- Click OK to finish filtering for these two sources.
There are two source types when retrieving logs in PowerShell, chkdsk and wininit. Run one of the two commands in PowerShell to view the most current chkdsk log:
get-winevent -FilterHashTable @ | ? | fl timecreated, message get-winevent -FilterHashTable @ | ? | fl timecreated, message To export the log to a specific location, the following can be added to the end of the command | out-file “$env:userprofile\location\filename.txt” . Example:
get-winevent -FilterHashTable @ | ? | fl timecreated, message | out-file "C:\Users\Administrator\Desktop\Chkdsk_Log.txt" get-winevent -FilterHashTable @ | ? | fl timecreated, message | out-file "C:\Users\Administrator\Desktop\Wininit_Log.txt" Related links
ScanDisk в Windows 10: Как Просканировать и Восстановить Диск в Windows 10/8/7
Что такое ScanDisk? Можно ли запустить команду ScanDisk для сканирования и устранения проблем с дисками в Windows 10? Если вы хотите использовать ScanDisk в более новых версиях Windows после MS-DOS, таких как Windows NT, Windows 9x и Windows 3.x, тогда нужно обратиться к его преемнику CHKDSK, который можно найти в Свойствах Windows, Командной Строке и EaseUS Partition Master.

Что такое ScanDisk? Можно ли пользоваться ScanDisk для сканирования исправления ошибок на диске в Windows 10? Если вы хотите использовать ScanDisk в более новых версиях Windows, вышедших после времён MS-DOS (например, Windows NT, Windows 9x, and Windows 3.x), тогда нужно перевести своё внимание на его приёмника – CHKDSK, который можно найти в [1] Свойствах Windows, [2] Командной Строке и [3] EaseUS Partition Master – сторонней программе для работы с разделами для старых и новых версий ОС Windows.
Чтобы быстро проверить диск на ошибки пользуйтесь:
- Windows Properties
- Command Prompt
- EaseUS Partition Master
Что такое ScanDisk?
ScanDisk, также известная как Scan Disk, это утилита Windows на базе DOS, предназначенная для автоматического обнаружения и исправления проблем с жестким диском и ошибок файловой системы. Впервые она была представлена в MS-DOS 6.2, поэтому ScanDisk имеет уже долгую историю. Несмотря на то, что ScanDisk может улучшить производительность жесткого диска и помочь в обслуживании файловой системы Windows, она слишком устарела, и больше не поддерживается в более поздних операционных системах Windows. Поэтому она была полностью заменена обновленной утилитой под названием CHKDSK (произносится как Check Disk).
Другими словами, в разных операционных системах Windows, есть свои инструменты для выполнения таких функций.
ScanDisk доступен и запускается в:
- Windows 95 и 98
- Windows 3.x и MS-DOS
*Windows NT – это хорошая операционная система, но здесь нет ScanDisk по умолчанию. Обычно, для проверки целостности диска в Windows NT нужно использовать различные сторонние утилиты.
В более поздних ОС Windows — Windows XP, Vista, 7, 8, 8.1, 10 ScanDisk заменен на CHKDSK.
Что мы знаем о ScanDisk:
- 1. ScanDisk проверяет только те жесткие диски, которые отформатированны в FAT, например: FAT12, FAT16 и FAT32.
- 2. ScanDisk умеет распознавать сжатые тома и длинные имена файлов.
- 3. ScanDisk может автоматически восстанавливать файлы с перекрестными ссылками и потерянные кластеры.
- 4. Вы должны загрузить компьютер в Безопасном Режиме, чтобы запустить ScanDisk.
- 5. Windows 95 OSR2 и Windows 98 запускают ScanDisk автоматически, если компьютер был выключен неправильно.
Что такое CHKDSK?
Будучи преемником ScanDisk в более новых операционных системах Windows, начиная с Windows XP, утилита CHKDSK разработана для контроля состояния вашего жесткого диска. Она умеет сканировать файловую систему диска и анализировать целостность файлов, файловой системы и метаданных файлов на диске. Утилита автоматически устраняет проблемы, если таковые были обнаружены.
Благодаря интуитивно понятному пользовательскому интерфейсу CHKDSK, проверять, сканировать и исправлять ошибки жесткого диска стало гораздо проще. Пользователи Windows могут использовать утилиту CHKDSK двумя способами: через Свойства Windows и Командную Строку Windows.
Как Запустить ScanDisk в Windows 10/8/7
Как уже упоминалось выше, для сканирования и поиска проблем на жестком диске и ошибок файловой системы в новых версиях Windows используется уже не ScanDisk, а его альтернатива – CHKDSK.
Способ 1. Запуск CHKDSK через Свойства Windows
Шаг 1. Откройте Проводник (клавиши Windows + E) > щелкните правой кнопкой мыши на диске, который вы хотите проверить и исправить > выберите Свойства.
Шаг 2. В окне Свойства переключитесь на вкладку Сервис. В разделе Проверка на наличие ошибок нажмите Проверить.
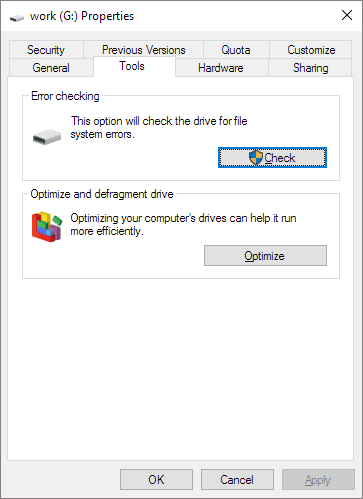
Шаг 3. В окне Проверка Ошибок нажмите кнопку Проверить диск.
Процесс сканирования обычно занимает от 10 минут до нескольких часов, в зависимости от размера выбранного диска. Windows попытается автоматически исправить ошибки диска при следующей перезагрузке компьютера.
Способ 2. Запуск CHKDSK из Командной Строки Windows.
Шаг 1. Нажмите кнопки Windows + X чтобы открыть меню задач > выберите Командная Строка (Администратор). Щёлкните Да если появится запрос от Контроля Учетных Записей.
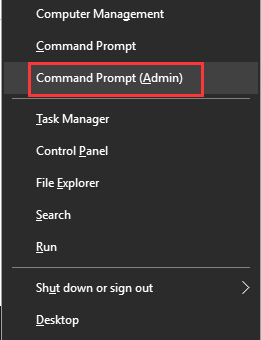
Шаг 2. В окне командной строки введите такую строку chkdsk c: /f /r /x и нажмите Enter.
- c: это буква диска, который нужно просканировать
- /f дает команду CHKDSK исправить все ошибки, которые будут обнаружены во время сканирования
- /r поручает CHKDSK найти и исправить поврежденные сектора на диске
- /x просит CHKDSK размонтировать диск перед началом процедуры
Как Проверить Ошибки Диска в EaseUS Partition Master
Независимо от того, идет ли речь об устаревшей ОС Windows или о современных компьютерах под управлением Windows 10, стандартная программа Windows для сканирования и проверки ошибок жесткого диска обычно требует много времени, а результат редко бывает удовлетворительным. Как вы можете видеть, метод командной строки подходит для опытных пользователей, и любая ошибка в параметрах чревата новыми проблемами на диске. Итак, задумывались ли вы о другой отличной альтернативе устаревшему ScanDisk или простому CHKDSK?
Вероятно, что да. Если вы искали более простую, быструю, но при этом эффективную программу на замену CHKDSK, тогда воспользуйтесь EaseUS Partition Master. Это сторонний инструмент partition magic, предназначенный для управления жесткими дисками и разделами, повышения производительности и продления срока службы диска. Программное обеспечение управления разделами EaseUS легко справится со сканированием и исправлением ошибок жесткого диска.
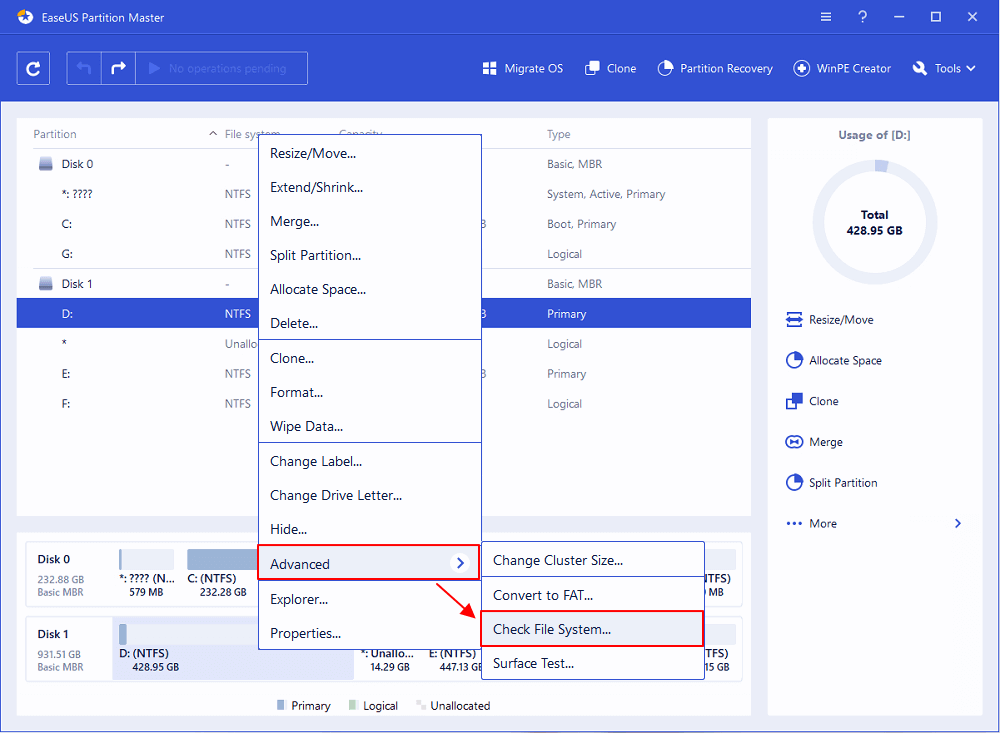
Шаг 1: откройте EaseUS Partition Master на вашем компьютере. Затем найдите диск, щелкните правой кнопкой мыши на том разделе, который вы хотите проверить, и выберите опцию “Проверить файловую систему”.
Шаг 2: в окне “Проверить файловую систему” оставьте активной опцию “Попытаться исправить ошибки, если они обнаружены” и нажмите “Пуск”.
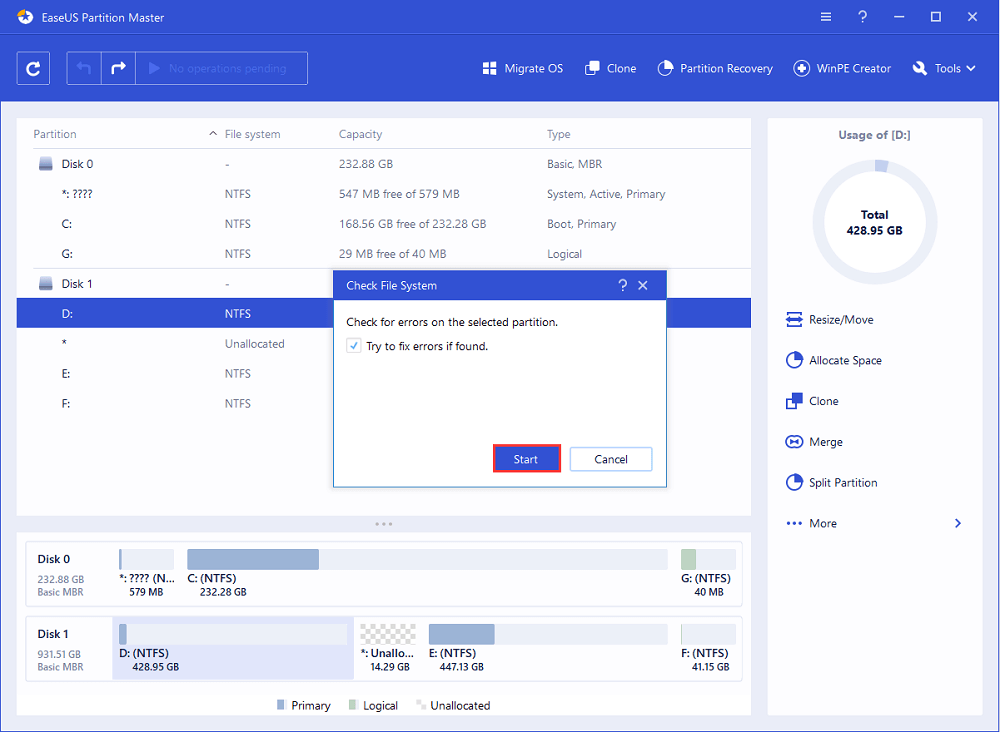
Шаг 3: программа начнет проверку файловой системы вашего раздела на диске. Когда она будет завершена, нажмите “Готово”.
Последние статьи – Также в программе EaseUS
При подготовке материала использовались источники:
https://learn.microsoft.com/en-us/windows-server/administration/windows-commands/chkdsk
https://www.easeus.ru/partition-manager-tips/scandisk.html