 Онлайн Радио 24
 ASUS Boot Setting

![]()
Work with boot settings of your PC to enhance the startup procedure. Access BIOS settings directly and check them in order to switch the launch modes, remove certain devices from the automated reading list, etc. Save the settings and apply them for the next startup.
Скачать ASUS Boot Setting 1.0.23 бесплатно с архива. Вы можете найти следующие загрузочные файлы программы: fastboot.exe, AsInsWiz.exe, ATKOSDMgr.exe, Discovery.exe или lumen.exe и т.д.
ASUS Boot Setting относится к категории Системные утилиты. Самая популярная версия среди пользователей ПО 1.0. Файл пакета установки занимает 5.2 MB на вашем диске.
Наша антивирусная программа просканировала эту загрузку и признала ее полностью безопасной. Эта бесплатная программа принадлежит ASUSTeK COMPUTER INC. ASUS Boot Setting устанавливается на Windows XP/XP Professional/Vista/7/8/10/11, 32-бит версию.
От разработчика:
The ASUS Boot Setting utility provides better flexibility in customizing your PCs startup process. You can enter the BIOS directly with one click through a user-friendly interface, and quickly select your preferred system boot up method: either get to the OS in seconds or opt for regular boot up. Whatever your choice, settings are saved and persistent, with no need to choose every time you power on.
Мы предлагаем оценить другие программы, такие как ASUS Manager – Ai Booting, ASUS Share Link или ASUS PC Link, которые часто используются вместе с ASUS Boot Setting.
Changing Boot Order on ASUS BIOS: A Step-by-Step Guide
While specifying boot priority is not required when using a single bootable device, it is essential for users who prefer multi-booting. Since your ASUS system selects the drive listed at the top of the boot order, you need to arrange them in a proper sequence.
To manage your bootable devices on ASUS BIOS, get to Boot Priority in the EZ mode or Boot Option Priorities in the Advanced mode. Now, drag and drop the drives in desired positions or set them accordingly in the respective boot options.
For instance, I have installed Ubuntu on my primary drive and Windows on the secondary. By default, Ubuntu is booted every time I start the PC but what I prefer is Windows.
Even though it’s possible to select the latter from ASUS Boot Menu, doing so every single time on startup can be quite tedious. Instead, keeping the secondary drive first in the boot priority list will be the best solution here.
Table of Contents
Restart Your Computer to Access BIOS Interface
To access the Boot Order settings, you need to get to ASUS Legacy/UEFI screen first. If you haven’t accessed the interface before, the process isn’t as daunting as you might think.
Start/restart your PC and as soon as you see the ASUS/ROG/TUF screen, press the Del or F2 key.

The first screen is usually accompanied by “Please press Del or F2 to enter UEFI BIOS setting” or a similar message. Note that if you are late in pressing the dedicated key, another logo screen appears with a ‘loading’ icon and you won’t be able to access the ASUS BIOS.
To avoid this from happening, I suggest spamming the BIOS key as soon as your computer starts up. This even helps if the Fast Boot feature is enabled.
Note: The steps in this guide are emphasized on ASUS UEFI Utility. While the exact process slightly differs on Legacy BIOS, the idea remains the same. You just have to navigate to the dedicated Boot section and change the priority in a similar way that I have demonstrated below.
Manage Boot Priority in EZ Mode
In most ASUS models, the default BIOS menu screen is EZ mode. It offers a simple user interface that is easy to follow along, especially for beginners.
In EZ mode, you can manage all the basic system settings, including the boot device priority. My basic instructions below should help just that:
-
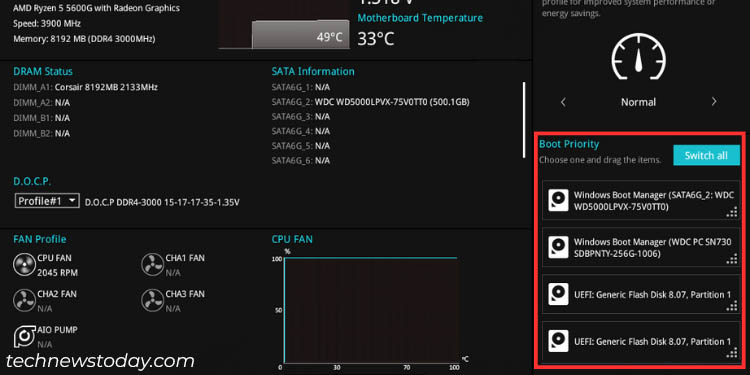
Locate the Boot Prioritysection, which should be at the bottom-right part of the EZ mode screen.
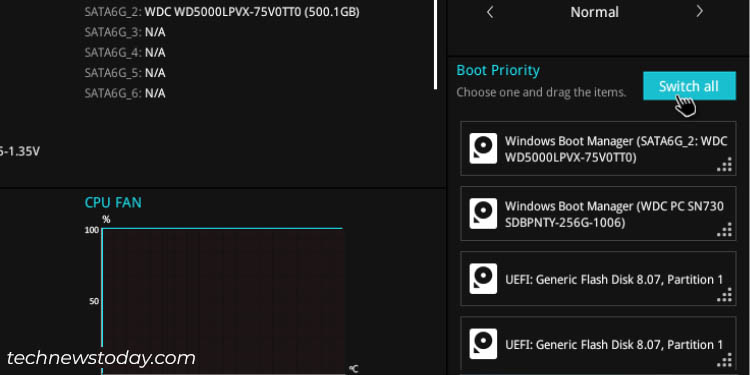
If you have more than four devices and want to manage all, press the Switch all button.
Click and drag the device (that you prioritize the most) to the first position in the list.
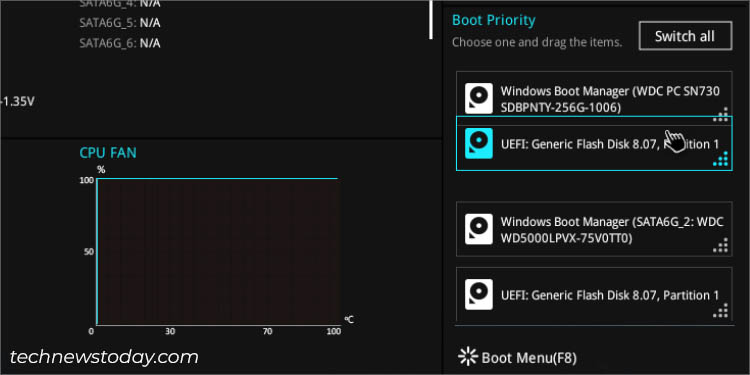
Since I want to use Windows, I have kept the dedicated hard drive in the top slot as shown above (for Windows, it should show Windows Boot Manager).
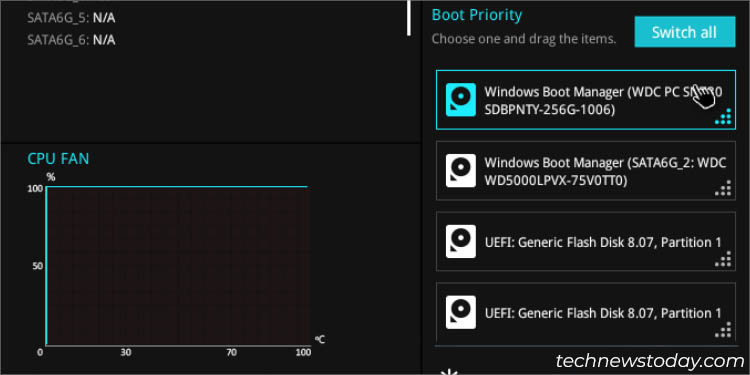
Then, place the next prioritized drive in the second position.
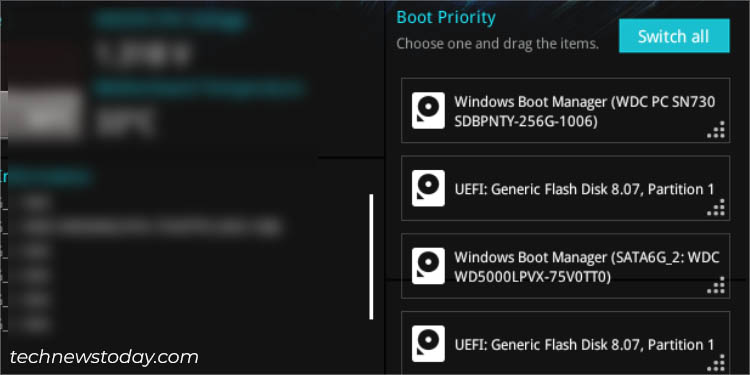
Repeat the above steps for your other bootable devices. In my case, I have connected four drives and this is how my final boot order will be:
Additional Tip: To quickly switch between EZ and Advanced modes in ASUS BIOS, use the F7 key.
Change Boot Priority in Advanced Mode
If your ASUS Setup mode is set to Advanced, you’ll directly be navigated to the Advanced mode. While you can quickly switch to EZ, it’s not at all necessary as there’s a dedicated Boot Option Priorities section in this mode as well (don’t confuse it with Boot Override).

-
First of all, navigate to the Boot tab.
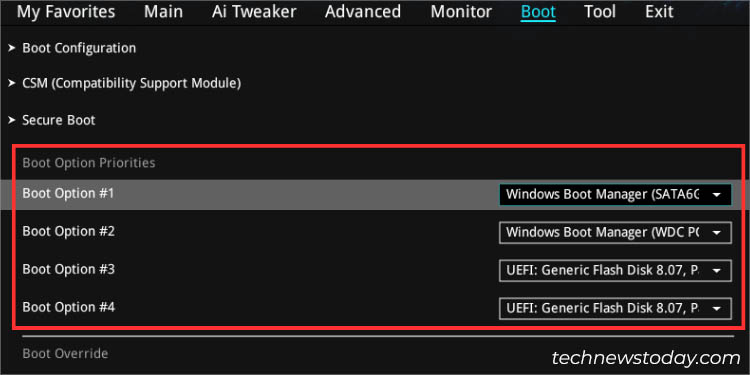
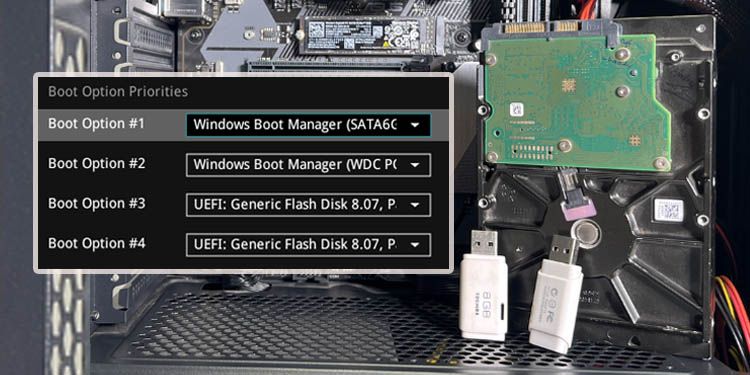
Locate the Boot Option Priorities section. Here, the number of boot options will change based on the number of connected devices.
For instance, I have four drives connected, and hence four options are available to me.
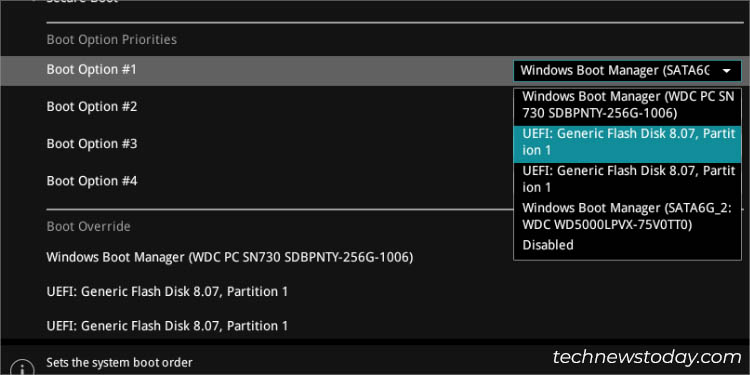
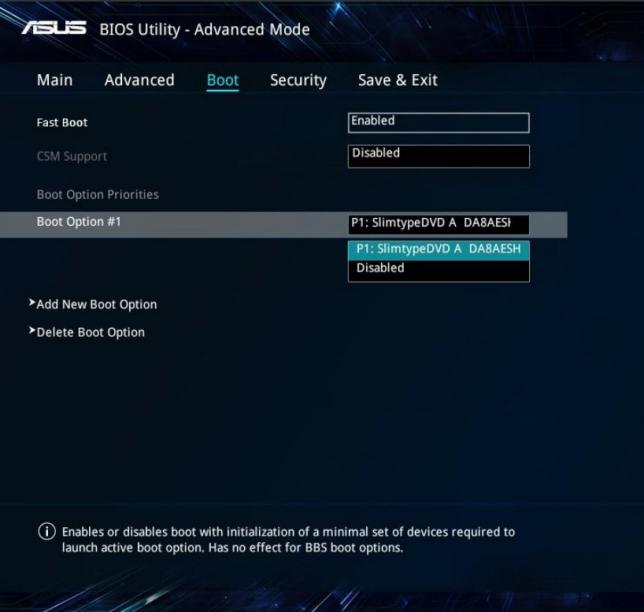
Start with the first boot option. Expand the drop-down and select the storage device that you wish to boot from.
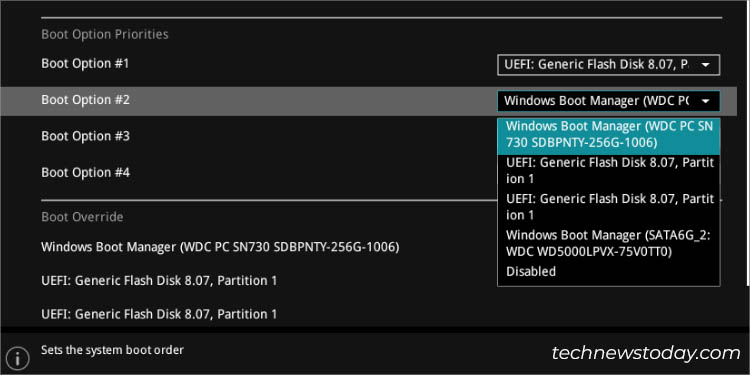
In my case, I am picking the USB flash drive as I want to install Windows 10.
Now, expand the second boot option’s drop-down and select the device you wish to keep as a second priority.
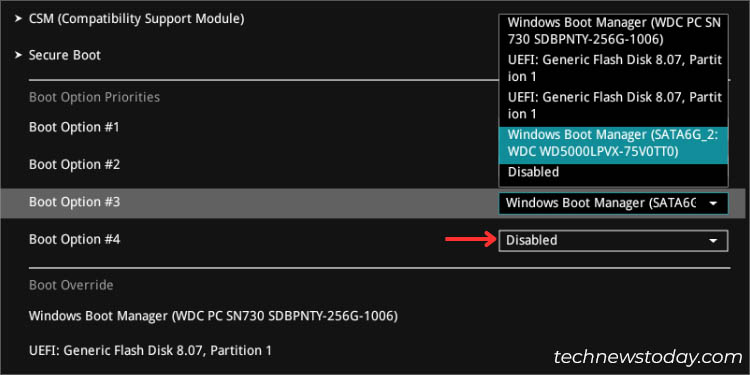
Repeat the same steps for the remaining boot options. As you can see below, you even get to disable the boot option.
Save Changes and Reboot
Once everything is configured, make sure you save this setting before exiting from the ASUS BIOS Utility. Press F10 followed by Ok and this should do the job.
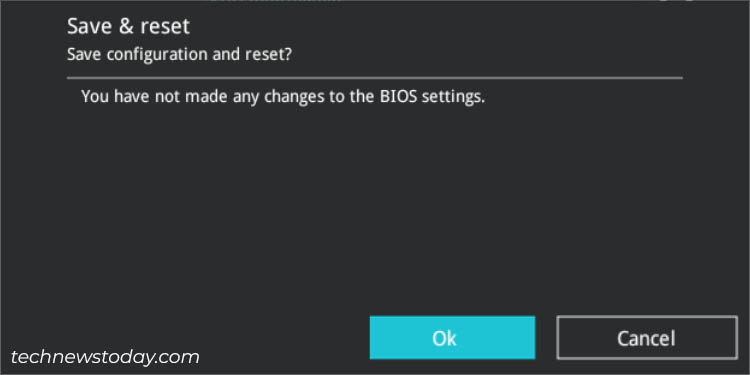
Since managing bootable devices is just a minor change, it won’t be shown in the dialogue box (as demonstrated in the above figure).
Quick Troubleshooting: If you’re trying to access an MBR-partitioned bootable drive on a UEFI system, it will likely not get detected in the Boot Priority section. A simple solution is to enable CSM, which should add legacy compatibility. So, you don’t require converting this drive to GPT.
Bhishu Acharya is a technical content writer at TechNewsToday. He specializes in monitors, laptops, storage devices, and other peripherals. Apart from computer hardware, you can also find his how-to and troubleshooting articles on Windows, internet, security, and networking. Ever since getting his hands on a personal computer, Bhishu started exploring its internal components at just 10. His growing curiosity led him to undertake the Computer Science & Information Technology degree and is just a year away from graduation. While balancing his study and work life for over four years, he has harnessed different sets of technical skills. With his expertise, he is now dedicated to helping netizens looking for hardware and software-related fixes. Today, Bhishu’s proficiency extends beyond computer hardware. In his spare time, he enjoys coding and learning new programming languages. You can contact him at bhishu@technewstoday.com
Как добавить boot option в биосе asus
Add New Boot Option — что это за настройка в биосе? (Asus)
Всем привет! Постараюсь найти информацию об этой настройке. Пока что ясно одно — настройку стоит использовать только после изучения профильных компьютерных форумов. Причина — можно напаратачить так, что ПК/ноутбук работать не будет (не смертельно, решается в СЦ, но все же).
Описание настройки
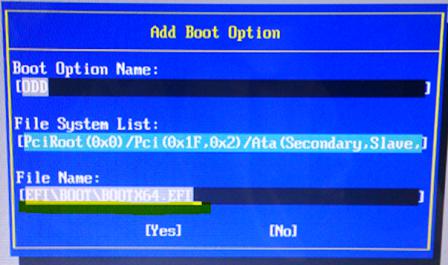
Add New Boot Option — переводится на русский примерно как добавить новый вариант загрузки. На самом деле почти верно — пункт означает добавить новое правило для загрузки (загрузочная запись).
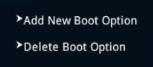
Позволяет вручную задать путь к загрузчику. В первом меню Boot Option Name указываем имя (любое). В File System List как понимаю указываем устройство. И в File Name — файл загрузчика. Данное меню выглядит примерно так:
После создания можно зайти в меню загрузочных устройств и там будет созданная вами запись.
Также у вас может быть рядом и другой пункт — Delete boot option — означает наоборот, удалить правило загрузки. Кстати эти пункты просто так удалять нельзя — могут быть серьезные проблемы.
Возможно пункт Add New Boot Option нужен чтобы вручную указать загрузочный файл. Другими словами — можно попробовать установить Windows, когда установочные файлы находятся не на диске/флешке, а на другом жестком диске. И при помощи опции указать что именно нужно запустить.
Например если устанавливается Ubuntu, то при выборе опции Add New Boot Option, в Path for boot option прописываем:
Нажимаем Create. В теории тоже самое должно работать и с Windows.
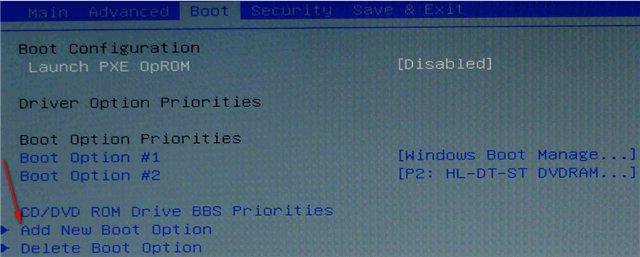
Пример — скриншот биоса, где показана загрузочная запись Windows Boot Manager, найденная на устройстве Hitachi (вероятно жесткий диск):

Данная запись значит что на устройстве Hitachi установлена Windows. Именно такой тип записи и можно добавить вручную при помощи настройки Add New Boot Option.
Пример настройки в современном биосе Asus:
Заключение
Мы рассмотрели настройку Add New Boot Option, выяснив, что нужна для добавления новой загрузочной записи. Под которой подразумевается указание файла установки операционной системы, возможно и устройство также нужно задать.
Настройки явно не для начинающих пользователей. При незнании лучше ничего не трогать.
ASUS Boot Setting — просто и быстро попадаем в BIOS
ASUS Boot Setting — утилита для простого входа в BIOS. Больше нет нужды нажимать 1000 раз клавишу DEL при включении компьютера. Просто скачиваете, распаковываете, и устанавливаете ASUS Boot Setting. Запускаете и жмете единственную кнопку — DirectBIOS. Выйдет предупреждение, что нужно сохранить свою работу и закрыть все приложения. Выполняете и жмете ОК. Пойдет перезагрузка и вы окажетесь в BIOS без каких-либо телодвижений.
Параметры bios, Устройство загрузки, На экране boot, выберите boot option #1 – Инструкция по эксплуатации Asus X42DQ

Version 1.28.1119. Copyright (C) 2008 American Megatrends, Inc.
Aptio Setup Utility — Copyright (C) 2008 American Megatrends, Inc.
Main
Security Save & Exit
Boot Option Priorities
[P0: Hitachi HTS545. ]
[P1: HL-DT-ST BDDVD.]
Hard Drive BBS Priorities
CD/DVD ROM Drive BBS Priorities
Delete Boot Option
Set the system boot order.
2. Нажмите [Enter] и выберите устройство для Boot Option #1.
Select Item
Enter: Select
+/—: Change Opt.
Перед включением системы,
проверьте правильность
подключения периферии
Version 1.28.1119. Copyright (C) 2008 American Megatrends, Inc.
Aptio Setup Utility — Copyright (C) 2008 American Megatrends, Inc.
Main
Security Save & Exit
Boot Option Priorities
[P0: Hitachi HTS545. ]
[P1: HL-DT-ST BDDVD.]
Hard Drive BBS Priorities
CD/DVD ROM Drive BBS Priorities
Delete Boot Option
Set the system boot order.
P0: Hitachi HTS545050B9A300
P1: HL-DT-ST BDDVDRW CT10N
Disabled
Похожие публикации:
- Где кнопка сна на ноутбуке asus
- Как включить безопасную загрузку на windows 10 в биосе asus
- Как включить подсветку экрана на ноутбуке asus
- Как вытащить жесткий диск из ноутбука asus
При подготовке материала использовались источники:
https://ru.freedownloadmanager.org/Windows-PC/ASUS-Boot-Setting-FREE.html
https://www.technewstoday.com/boot-order-asus/
https://midbox.com.ua/instrukciya/asus/kak-dobavit-boot-option-v-biose-asus