 Онлайн Радио 24
 Dead by Daylight “Оптимизация для слабых ПК”
Следующие настройки могут очень помочь. Если ваша игра выглядит как слайд-шоу даже с самыми низкими настройками видео, вы можете улучшить производительность, скопировав конфигурационный файл для слабых ПК.
Что делает конфигурационный файл для слабых ПК?
Вы сможете установить графику ниже, чем позволяют игровые настройки.
Характеристики ПК на видео:Processor : i3-3110M @ 2.40GHz (DUAL CORE) RAM : 4 GB Graphics: Intel HD 4000 OS: Windows 10 Pro 64-bit
Как установить?
Сделать это просто, просто скачайте конфиг, скопируйте, замените и наслаждайтесь!
Директория распаковки для Steam: %USERPROFILE%\AppData\Local\DeadByDaylight\Saved\Config\WindowsNoEditor
Директория распаковки для Epic Games:
Для смены разрешения – ResolutionSizeX=1280 ResolutionSizeY=720
Если конфиг не работает поставьте галочку “Только чтение” на файле GameUserSettings.ini, Scalability.ini (или уберите для редактирования файла).
Dead By Daylight – How To Boost FPS For Low-End PC’s & Laptops

If you’re experiencing low FPS while playing Dead by Daylight on your low-end PC or laptop, it can ruin the gameplay experience. Luckily, there are several tweaks and optimizations that you can do to boost the FPS and enhance your gaming experience. In this article, we’ll provide you with the essential tips and tricks to increase FPS in Dead by Daylight on low-end PCs and laptops.
Tweak your DbD Game User Settings
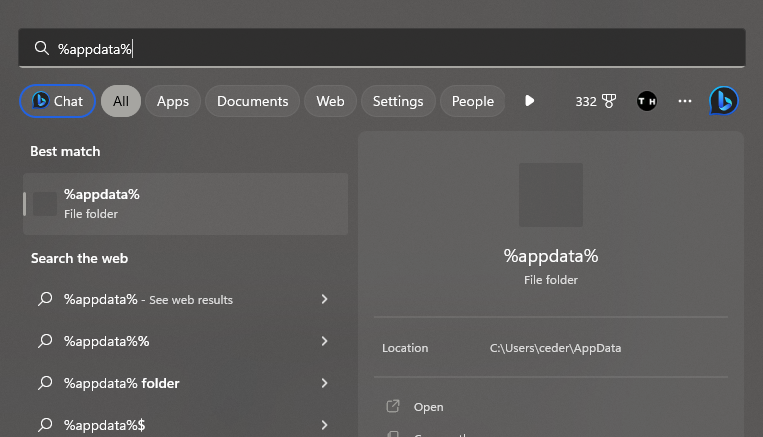
Optimizing your in-game settings can significantly improve the performance of low to mid-end PCs when playing Dead by Daylight. While the number of settings available in the game is limited, you can still adjust them through the GameUserFile to improve performance. These changes are especially useful for those who experience performance issues despite meeting the recommended system requirements. In this article, we will guide you through the steps to boost FPS for low-end PCs and laptops in Dead by Daylight. Close Dead by Daylight and navigate to %AppData% in your File Explorer.
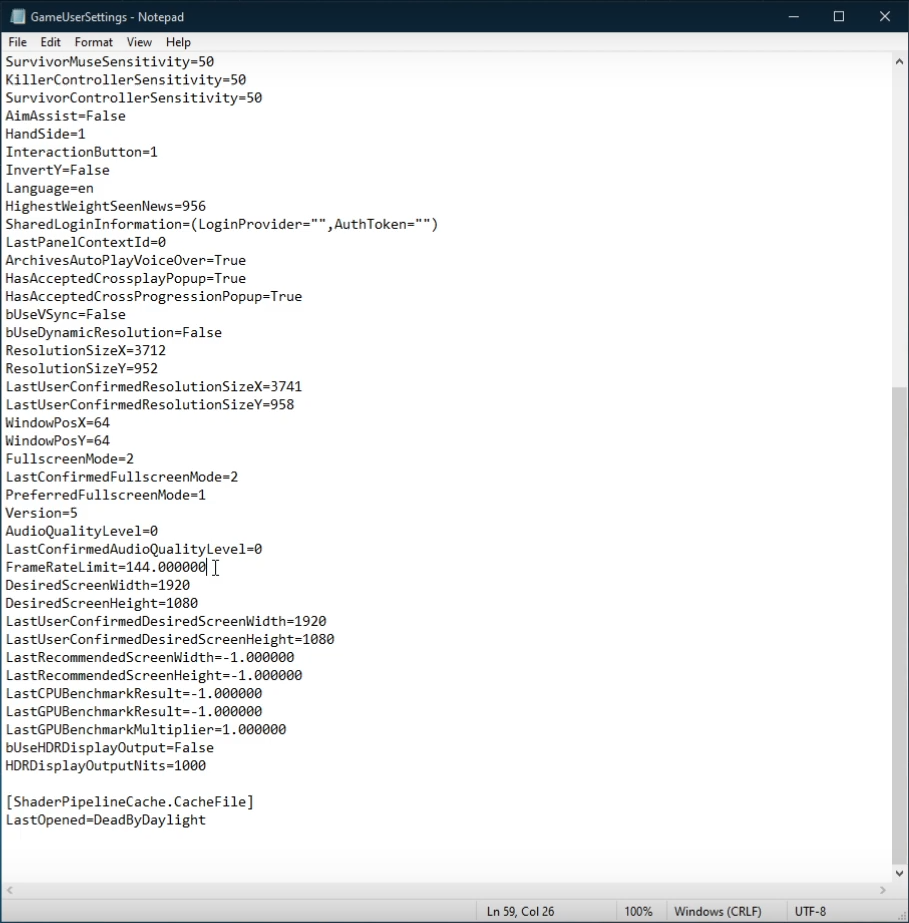
Open AppData > Local > DeadByDaylight > Saved Config > WindowsNoEditor. Open the GameUserSettings file using a text editor like Notepad. Scroll down to the bottom of the file and leave the HDR Display Output Nits option as it is. Set the desired screen width, screen height, and two options below to your native monitor resolution or a custom resolution. Set the FrameRateLimit option to your monitor’s refresh rate, and disable the Dynamic resolution and VSync options by setting their values to False. If you still experience performance issues, reduce the ScreenResolution option to around 80, but keep in mind that this will affect the visual quality of the game. Finally, apply your changes and save the file.
Change the Dead by Daylight Process Priority
If you want to improve your PC’s performance while playing Dead by Daylight, you can adjust the application’s priority compared to other programs running in the background. To do this, right-click your taskbar to open Task Manager, then go to the Processes tab. Find the Dead by Daylight process and right-click it, then select “Go to details”. In the Details tab, right-click the game process and set the priority to “High”. This will give the application more resources, which can result in smoother gameplay. Don’t change the priority to High if the game already uses up 100% of your CPU capabilities.

By setting a high priority for the Dead by Daylight application, it will receive more resources from your computer and improve performance, especially when running alongside other programs. To further optimize performance, it’s recommended to end unnecessary programs running in the background which may cause high CPU utilization. Be careful to only end programs you are familiar with and won’t affect your operating system. You can also prevent programs from starting up on system boot by accessing the Startup tab in your Task Manager.
Update Graphics Card Driver
NVIDIA graphics cards can utilize the GeForce Experience application. Click here to download the application to your system. When the download is completed, open up the application, and in the Drivers tab, select Download. This will download and install the latest GPU update and should only take a few minutes to complete.

Update Operating System
Ensure your operating system is up to date to optimize your system’s performance. Search for “Update” in your taskbar search and open “Check for updates” system settings window. Download and install the latest update, and restart your PC after the download is completed. This will help you resolve any performance issues.

Disable Windows Game Bar Recording
To improve your performance while playing Dead by Daylight on Windows 10, you need to disable some of the native Windows 10 settings. The Game Bar recording option should be turned off as it can cause continuous recording of your gameplay and audio. Open the game bar system settings by searching for Game Bar in your taskbar search.
Uncheck the recording option and go to the Captures tab to disable the background recording option as well. These settings are known to reduce performance. If you want to record your gameplay, it is recommended to use OBS Studio or an external capture card to avoid performance issues.

NVIDIA Control Panel Settings Adjustments
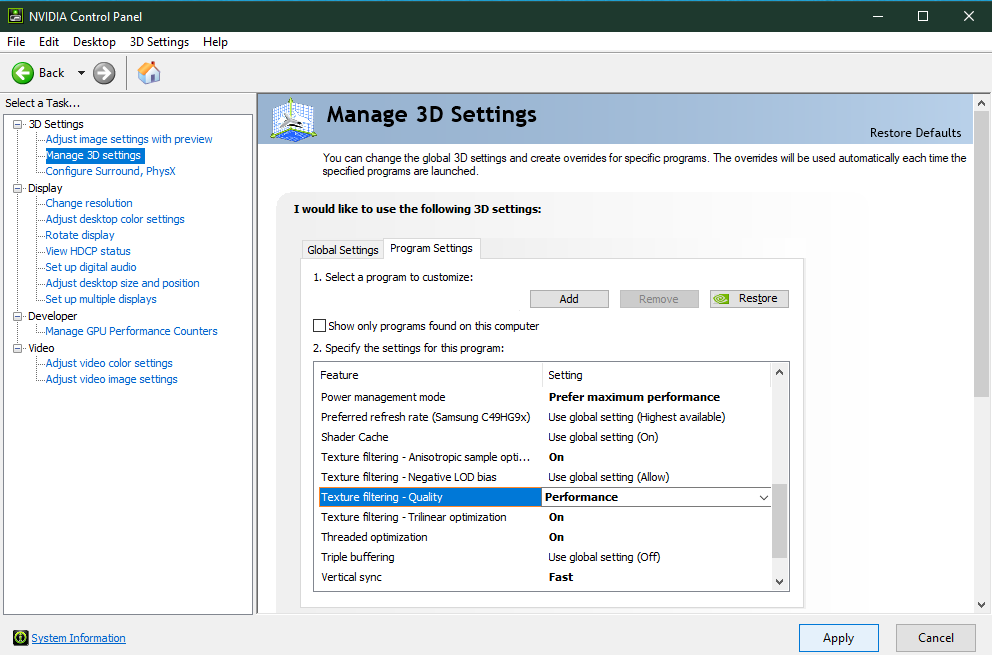
Optimizing your NVIDIA control panel can greatly enhance your Dead by Daylight gameplay experience. You can improve your system’s performance by making some changes to your NVIDIA control panel settings. To access your NVIDIA control panel, right-click your desktop and select NVIDIA Control Panel. From there, navigate to Manage 3D Settings > Program Settings.
To customize your settings for Dead by Daylight, select Add a program and add the game from the program list. If the game is not listed, you can browse for it in your file explorer. Once you’ve located the game, ensure that the CUDA setting is set to your primary GPU, the Power management mode to Prefer maximum performance, and the texture filtering quality to Performance. These settings will help you get the most out of your NVIDIA graphics card and improve your gameplay experience.
Change the Dead by Daylight Graphics Preference
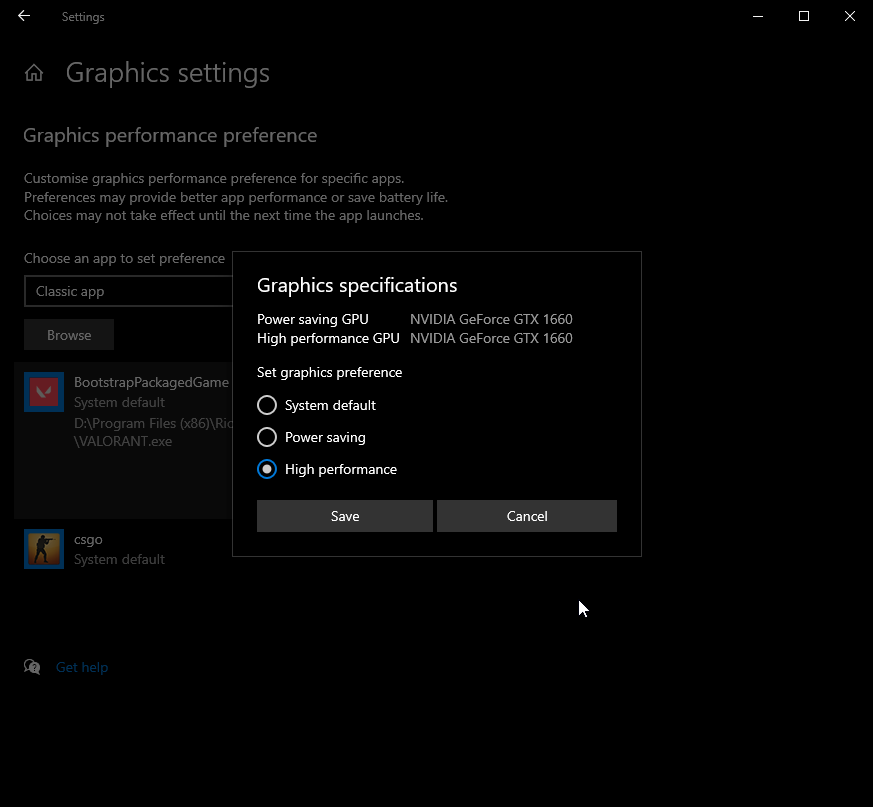
Optimizing Windows 10 power user settings can help improve your system’s overall performance, including your graphics settings. Search for “Graphics Settings” in your taskbar to access your graphics settings. Once opened, browse your file explorer to locate the drive and path where Dead by Daylight is saved, and add the program to your graphics settings list. From there, you can choose between different options including Let Windows Choose, Power Saving, High Performance, and Specific GPU. For optimal system performance, choose High Performance, but if your GPU is bottlenecking your performance, select Let Windows Decide. Make sure to apply any changes made.
Delete the Windows Temporary Files
Your hard drive might be cluttered with unwanted files. These files will induce lag if not removed properly. You can delete your temporary files manually or use PC cleanup programs, such as CCleaner. These applications are usually the best choice as it will automatically keep your hard-drive clean for you. To manually delete your temporary files, enter %temp% in your taskbar search and hit enter.
A new folder will open up. Delete the content of your temporary files folder. Sometimes, this can take a few minutes if you haven’t done this before. Some files will most likely stay in your temporary files folder, as these are still in use by your programs. To delete these files, you should also empty your recycle bin.
How to Unlock Your FPS in Dead By Daylight
![]()
Being a one of a kind horror journey, there is a lot to do and experience in Dead By Daylight. The higher quality you can play this multiplayer title in, the more gratifying your overall experience. However, there are some set restrictions implemented by Behaviour Interactive Inc. that can be a pain to deal with.
That does not mean that there is nothing to be done since you can take a few steps to unlock and possibly improve your graphics and frame rate cap. This method does not include any third-party software and is completely free to implement. With that said, let’s see what the method actually is.
In order to unlock your FPS in Dead By Daylight, you will need to go to AppData/Local/DeadByDaylight/Saved/Config/WindowsNoEditor. Open the file Gameusersettings.ini and edit the value of “FrameRateLimit” to 144 and change “bUseVSync” to False. Doing so will enable your game to unlock its default FPS cap.
Playing horror games on maxed-out settings is a different experience altogether. If you are blessed with a capable gaming rig, it can be really annoying to be limited by in-game caps. Therefore, this guide will be showing you an in detail method of manually changing Dead By Daylight’s graphics limits.
All Graphics Settings for Dead By Daylight
Before getting started, it would be a good idea to familiarize yourself with the graphical settings available in Dead By Daylight. This will help you in understanding the exact changes you need to make the game run in the best settings possible. With that said, here are all the graphical settings available:
Quality
This metric can ramp up the overall quality of your game. Every option will add more styling and features to the game. Unfortunately, Dead By Daylight doesn’t give you much options when it comes to adjusting your graphics. You can only choose from Low to Ultra. Generally, settling for High is your best bet if you aim to get consistently high frame rates.
Auto-Adjust
The Auto-Adjust features uses your system’s current specifications, your monitor’s refresh rate and adjusts the game’s graphics accordingly. However, these aren’t always accurate and there’s a high chance that you might end up with sub-par settings. Therefore, we generally recommend setting them on your own.
Resolution
Using the game’s automatic resolution feature, you’ll be able to get down to your monitor’s resolution with relative ease. However, you might need to adjust your resolution depending on whether you have a less capable GPU or just want to experience some higher frame rates on a lower resolution.
Full Screen
Dead By Daylight also features a fullscreen option. However, you won’t be able to find borderless fullscreen or other handy options. So, players who play the game on extended monitors or on ultra wides might run into some trouble.
How to Change Your FPS in Dead By Daylight
Here are the steps you can take in order to boost your FPS cap in Dead By Daylight. Make sure to restart your game in order for the changes to take effect.
Follow the Instructions below:
- Close the game and search for %appdata% in your taskbar. Upon hitting the enter button, your file explorer will open up showing some files.
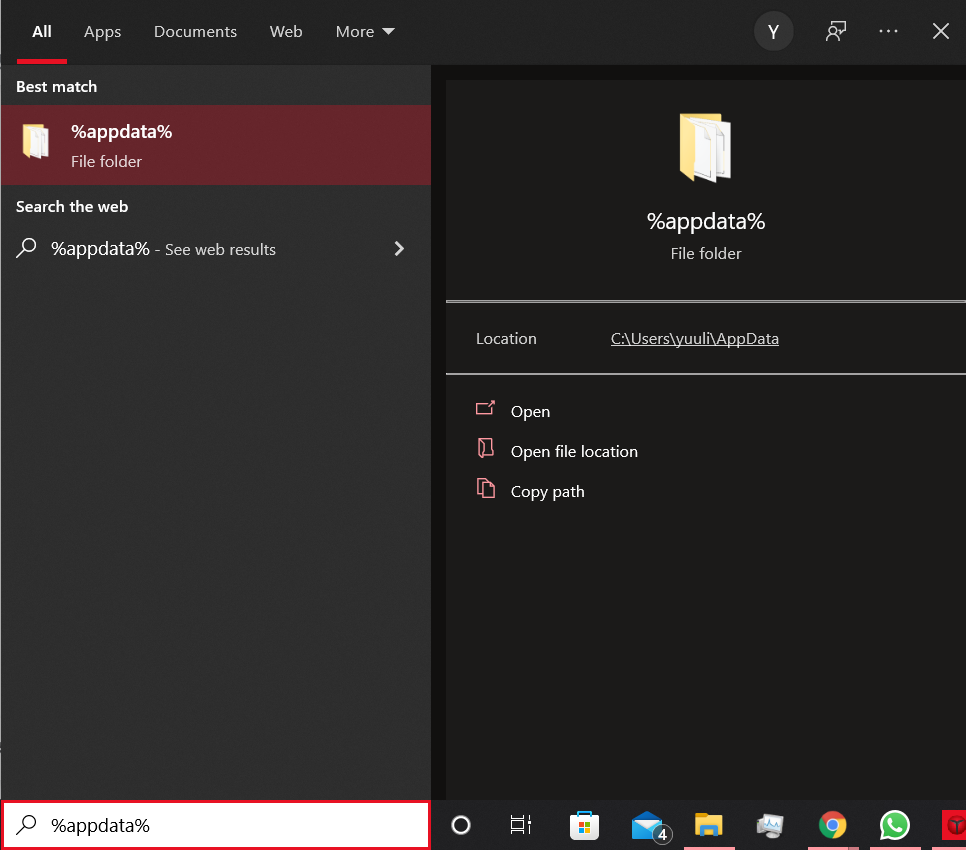
- Navigate to Local and look for DeadByDaylight. Once found, open it and head to Saved => Config => Windows No Editor.

- Right Click the “GameUserSettings” file and open it with notepad. A bunch of values will show up.
- Change your “FrameRateLimit” Value to your needs. For this tutorial, we will be using 300.000000 as the base value.
- Change the “bUseVSync” value to False and press save from the file menu or simple press CTRL + S
- Right click the GameUsersettings file and click on properties. After that, click on Read-only and hit apply.
Now you will be able to get up to 300 FPS in Dead By Daylight. There is also another optional step you can perform to check if anything has changed or not. While such a big FPS jump is noticeable at first glance, you can use a counter to confirm your suspicions regardless.
To do this, simply:
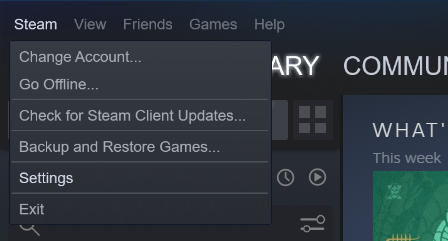
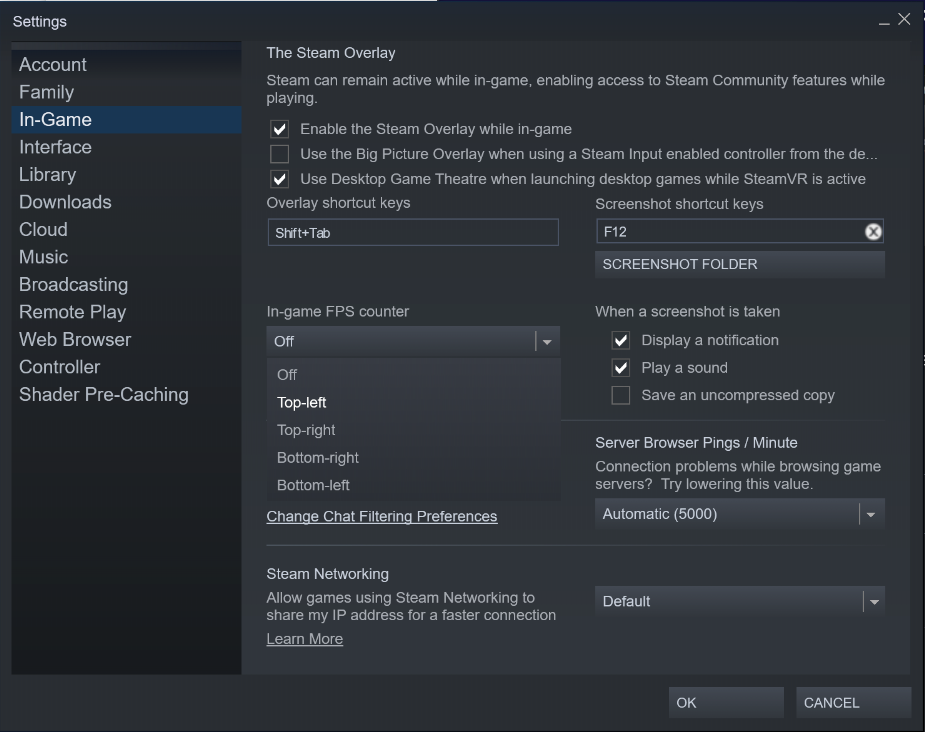
- Open Steam and head to the settings tab. You can do this by clicking on the steam tab in the top right.
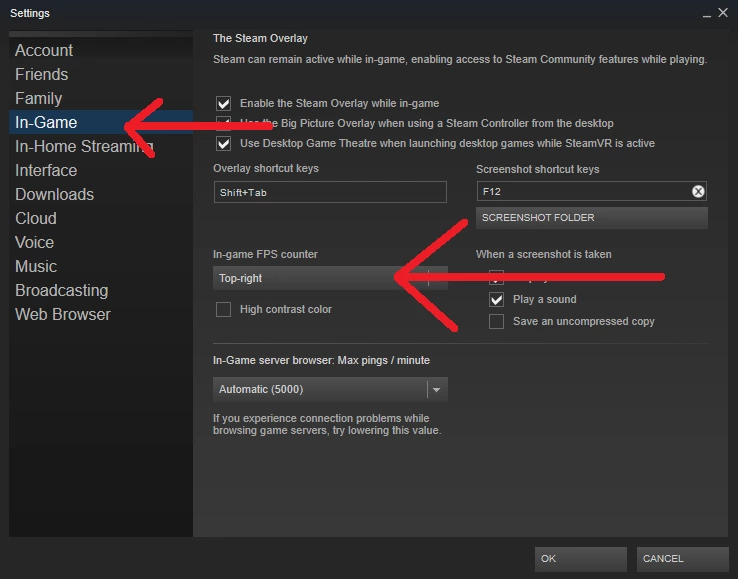
- From there, find and click on the “In game” tab.
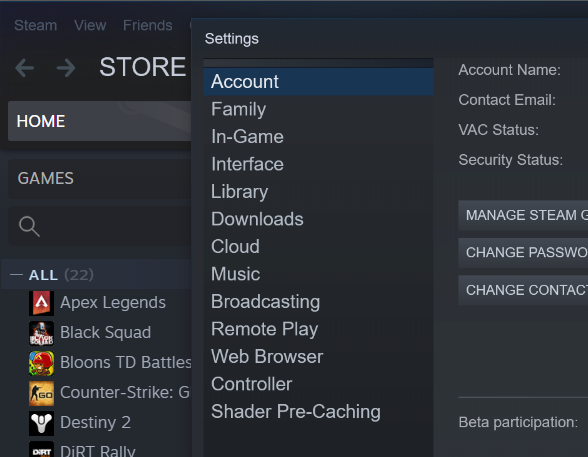
- Turn the in-game FPS Counter by choosing one of the available options. These include the four corners of the screen. Choose location of this counter and press OK.
Now reopen Dead By Daylight to see your new in-game FPS. You can also use this method to change settings like your in-game resolution, music settings, and more!
Are More Settings Coming to Dead By Daylight?
For now, the answer to this question is an unfortunate no. However, we might be expecting some more customizable options to show up as more and more updates start to pile up. While you wait for the official settings to be added to the game, you can use the above method to directly edit the game files.
With regular updates coming nonstop it only seems like a matter of time before we get to see Behaviour Interactive Inc to add this feature in DBD officially.
All in all, you can use the steps mentioned above to change your in-game settings. Many players have voiced their concerns about a lack of advanced graphics options in the official forums. However, there has been no official statement by BHVR as of yet.
Another key point to note is that by using the method above, you are essentially tinkering with the core game files. There is a certain chance that you might get banned for it. However, no such incident has been reported as of yet but it is still advisable to do it at your own discretion.
При подготовке материала использовались источники:
https://www.playground.ru/dead_by_daylight/file/dead_by_daylight_optimizatsiya_dlya_slabyh_pk-1158670
https://www.techy.how/tutorials/dbd-fps-boost
https://gamevoyagers.com/how-to-unlock-your-fps-in-dead-by-daylight/